How to get started with the Arduino CLI for beginners and power users (Comprehensive tutorial)
By Aditya
/
August 2, 2022
As the Arduino CLI (Command Line Interface) enters its first stable version (v1.0) after its release, it is easier than ever to integrate the Arduino framework with your favorite IDE/text-editor and author,compile and upload your programs to your Arduino board. This blog provides a comprehensive, yet easy-to-follow tutorial for beginners &power users alike to use the Arduino CLI, from downloading and installing, to creating and uploading your first sketch, addingboards/cores, adding libraries, common workflows and even covers how tointegrate Arduino CLI with VS Code. This guide will help you streamline your Arduino development process, whether you're working on simple projects or complex embedded systems. It also includes a summary of commands in the end for future referencing.
For beginners, it briefly explains how the Arduino's modular build system and library manager work, which is important to use some of the Arduino CLI's commands. For power users, this tutorial shows certain advanced workflows as well, including automated builds and continuous integration.Let's get started!
Who this guide is for
Whether you're looking to streamline your workflow, automate your builds, or gain deeper insights into embedded development, Arduino CLI has something to offer - and this guide will show you how to harness its full potential.
Beginners
- If you're new to Arduino and want to understand the underlying build and flash process, demystifying what happens behind the scenes.
- Anyone looking to build a stronger foundation in embedded development, setting you up for more advanced projects in the future.
Intermediate users
- Arduino enthusiasts who want to boost productivity by using their favorite text editor or IDE for development.
- Developers seeking to speed up their Arduino coding process or create a more flexible development environment tailored to their needs.
Power users
- Experienced developers looking to take their projects to the next level by integrating Arduino into automated or remote workflows.
- Developers working on complex, multi-board projects requiring custom scripting and advanced build processes.
Let us not move onto seeing what the Arduino CLI is.
What is the Arduino CLI
For quite some time, the classic Arduino IDE was the primary way to build and flash programs to Arduino Boards. While it succeeded in providing a simple, all-in-one solution for beginners, the Arduino IDE had multiple limitations -
- Lack of modern IDE features, such as auto-completion, advanced find & replace, multi-cursor editing, documentation preview, jump to references/definition/declaration etc.
- Lack of theming (the colors could be manually changed but it never looked great).
- Absence of built-in source control integration (such as Git).
- No extensibility, multi-language support, etc.
Furthermore, there was no way to integrate the compile and upload steps outside the IDE or in your own workflow, since the tools were strongly coupled with the IDE.
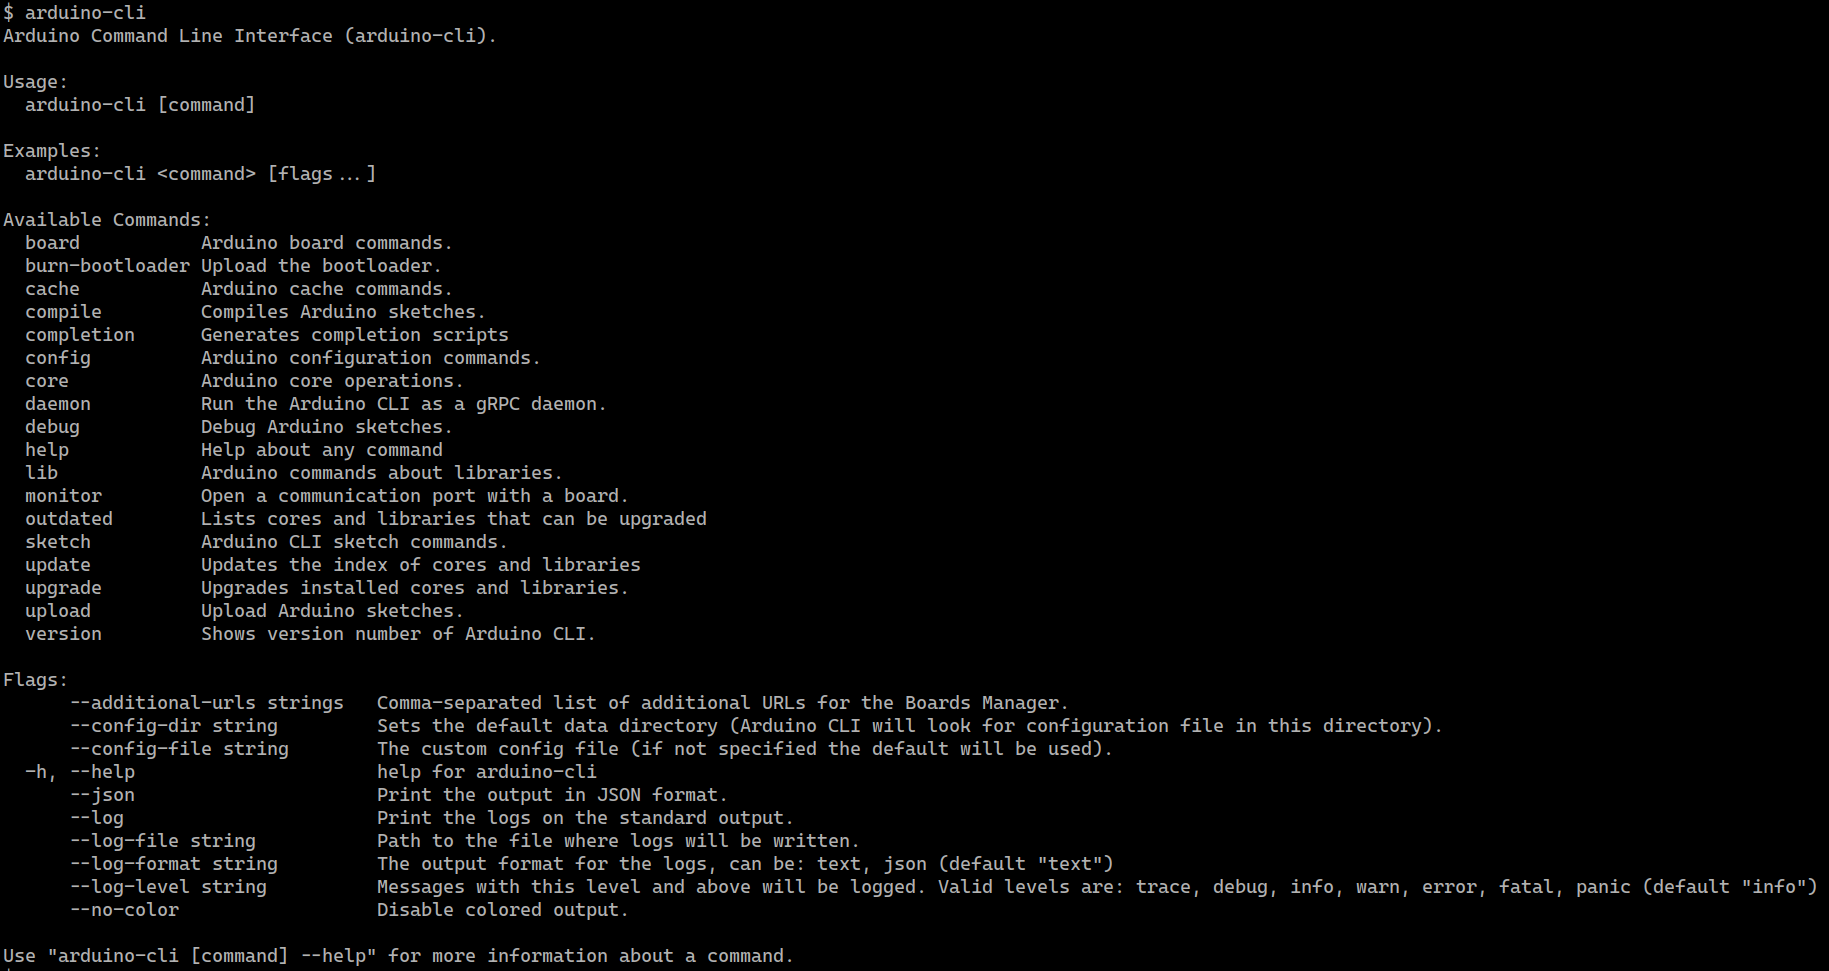
The Arduino CLI is a command line tool that allows you to perform all build-related tasks on the Arduino platform using text commands in a terminal/IDE. It was created by Arduino to provide more flexibility and integration options compared to the Classic IDE. It comes as an executable named arduino-cli, which can be invoked from a terminal. We will see more about this soon.
What is a command line interface (CLI)?
This section attempts to briefly introduce Command Line Interfaces to beginners and clear the mystery surrounding them. Power users who are already familiar with CLIs and scripting can skip this section.
A Command Line Interface (CLI) is a text-based way to interact with a computer program or operating system. Instead of clicking buttons in a graphical interface, you type commands in a shell to perform actions. A shell is a program that reads the commands you input using your keyboard and interprets them. If you have never worked with a Command Line interface, it may sound a little intimidating, but it need not be so. In the GUI (Graphical User Interface) world, most actions are performed by pointing & clicking (using a mouse or touch interface), while in the CLI world, the same actions can be accomplished by typing text commands.
For example, consider that you want to move a image named"image1.png" to another directory and rename it to "image_1.png". If you were using the GUI (say, the file explorer program on Windows), you would perform the following steps -
- Open the folder that contains the image.
- Right-click on the image and select the cut option from the floating menu.
- Open the folder where you want to move the image.
- Right-click in a blank location and click the paste option from the floating menu.
- Right-click on the pasted image and select the rename option from the floating menu.
- Type the new name of the file and press the enter key to confirm it.
If you were to do the same thing using the CLI (say, using Powershell on windows), you would perform the following step -
- Type the command
mv C://location-1/image1.png C://location-2/image_1.pngto move and rename the file.
In particular, note that that the GUI was primarily dependent on the mouse, while the CLI was primarily dependent on the keyboard. Also, it was incidental that the above operation required fewer steps to perform in the CLI than the GUI, and this is not always the case (CLIs are still considered to faster overall).
Note that both the CLI and GUI can be used to do the same tasks, and it is merely the method of interaction with the computer/Operating System that changes. You can read more about it here.
Even if you are using a GUI based OS like Windows or Mac OS, you will still find them to have CLI shells installed by default, which you can use. Before starting with the Arduino CLI, let us briefly go over these and get familiar with them.
Windows
Linux (Ubuntu)
Windows
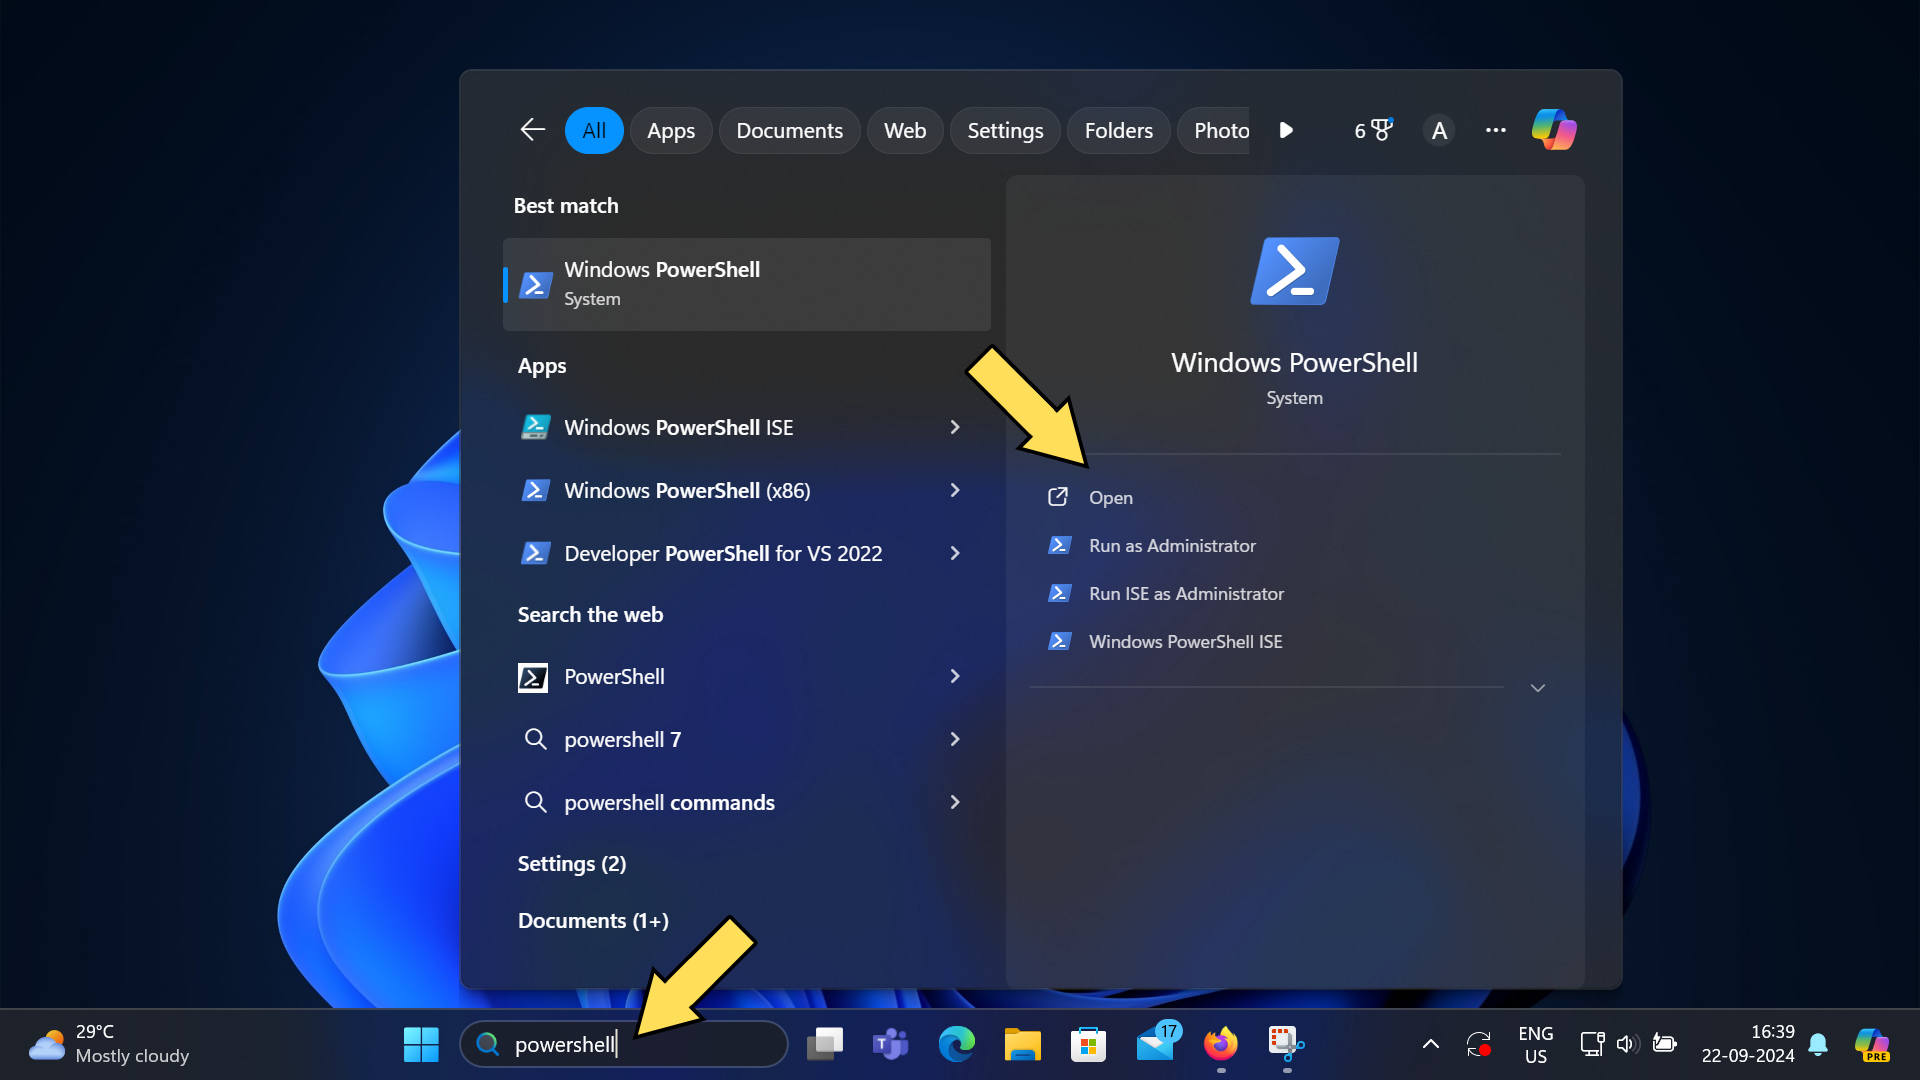
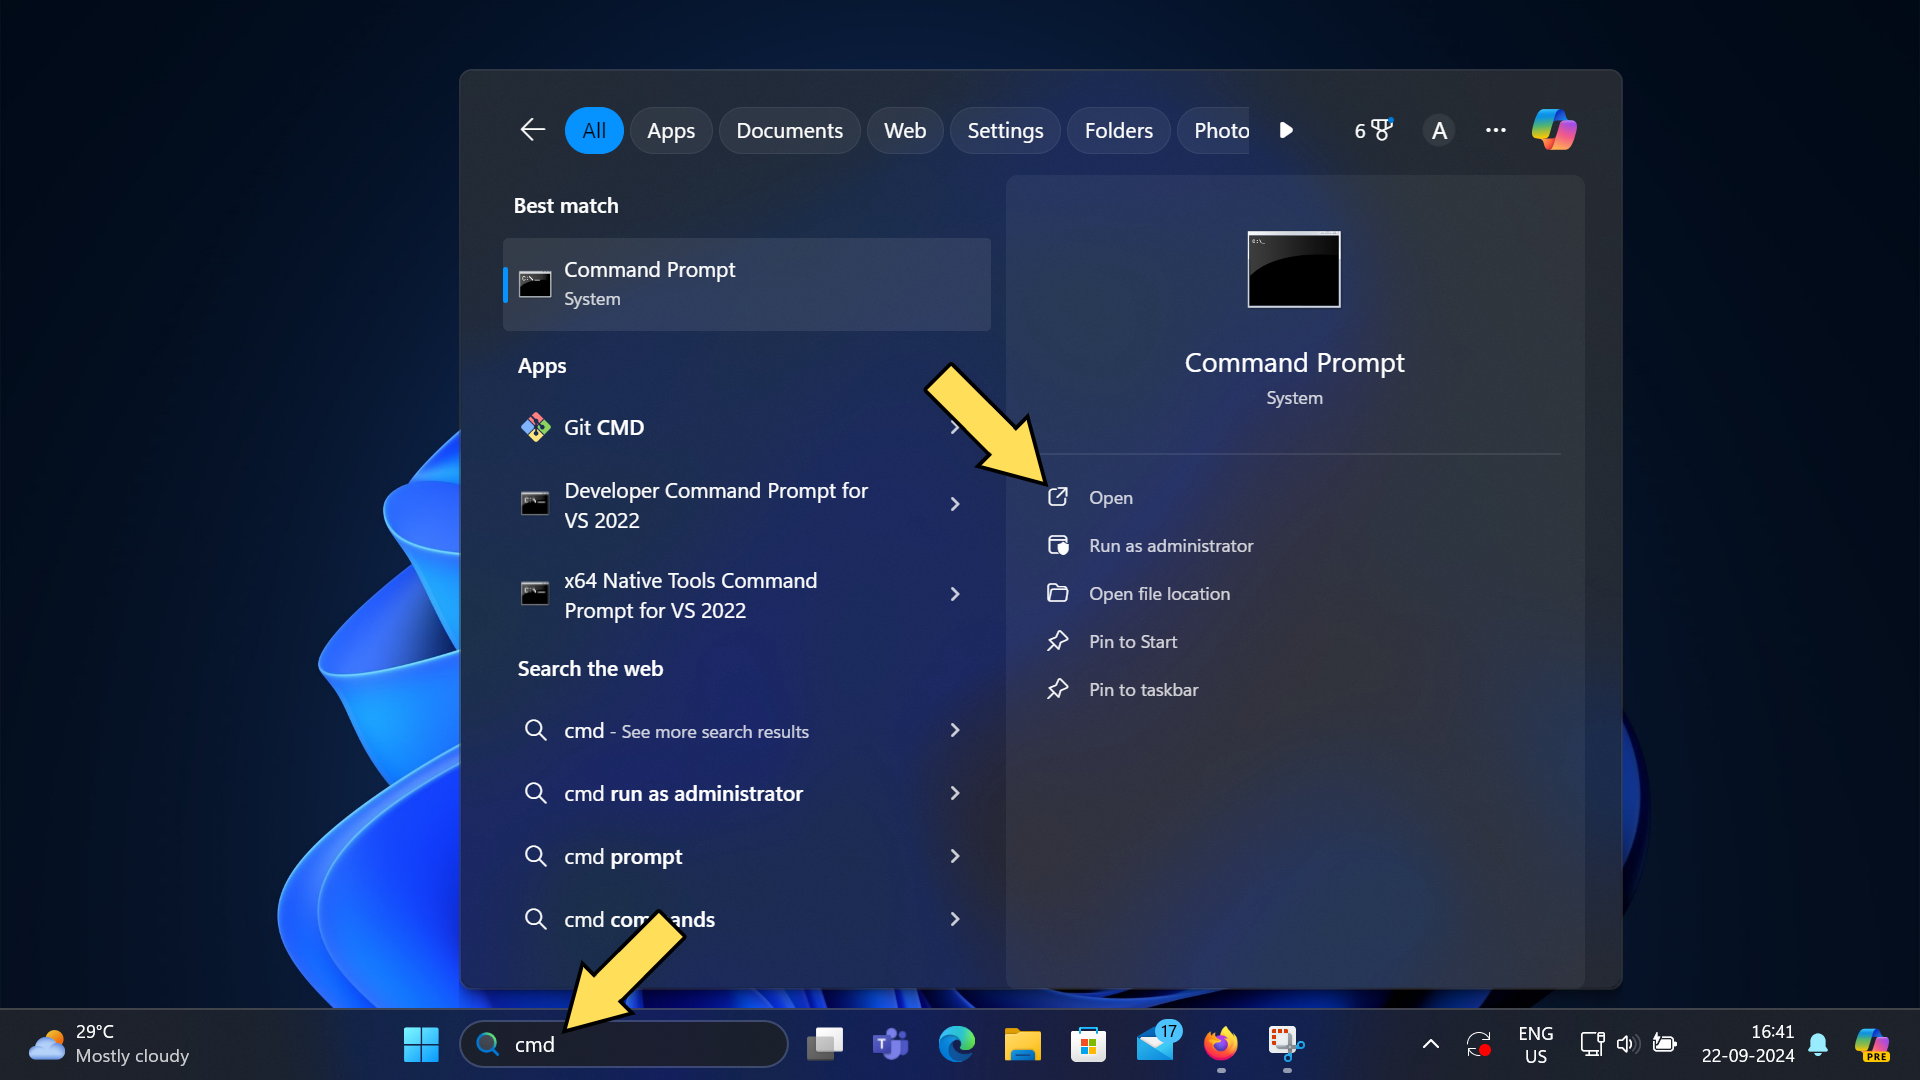
By default, Windows includes two shells - Powershell & Command Prompt. Either is fine for this blog, but Microsoft recommends Powershell, which is more modern and has more features. To open a shell, use the "Win+S" keyboard shortcut to open the Windows search bar, and type the name of the shell that you want to use, as shown -
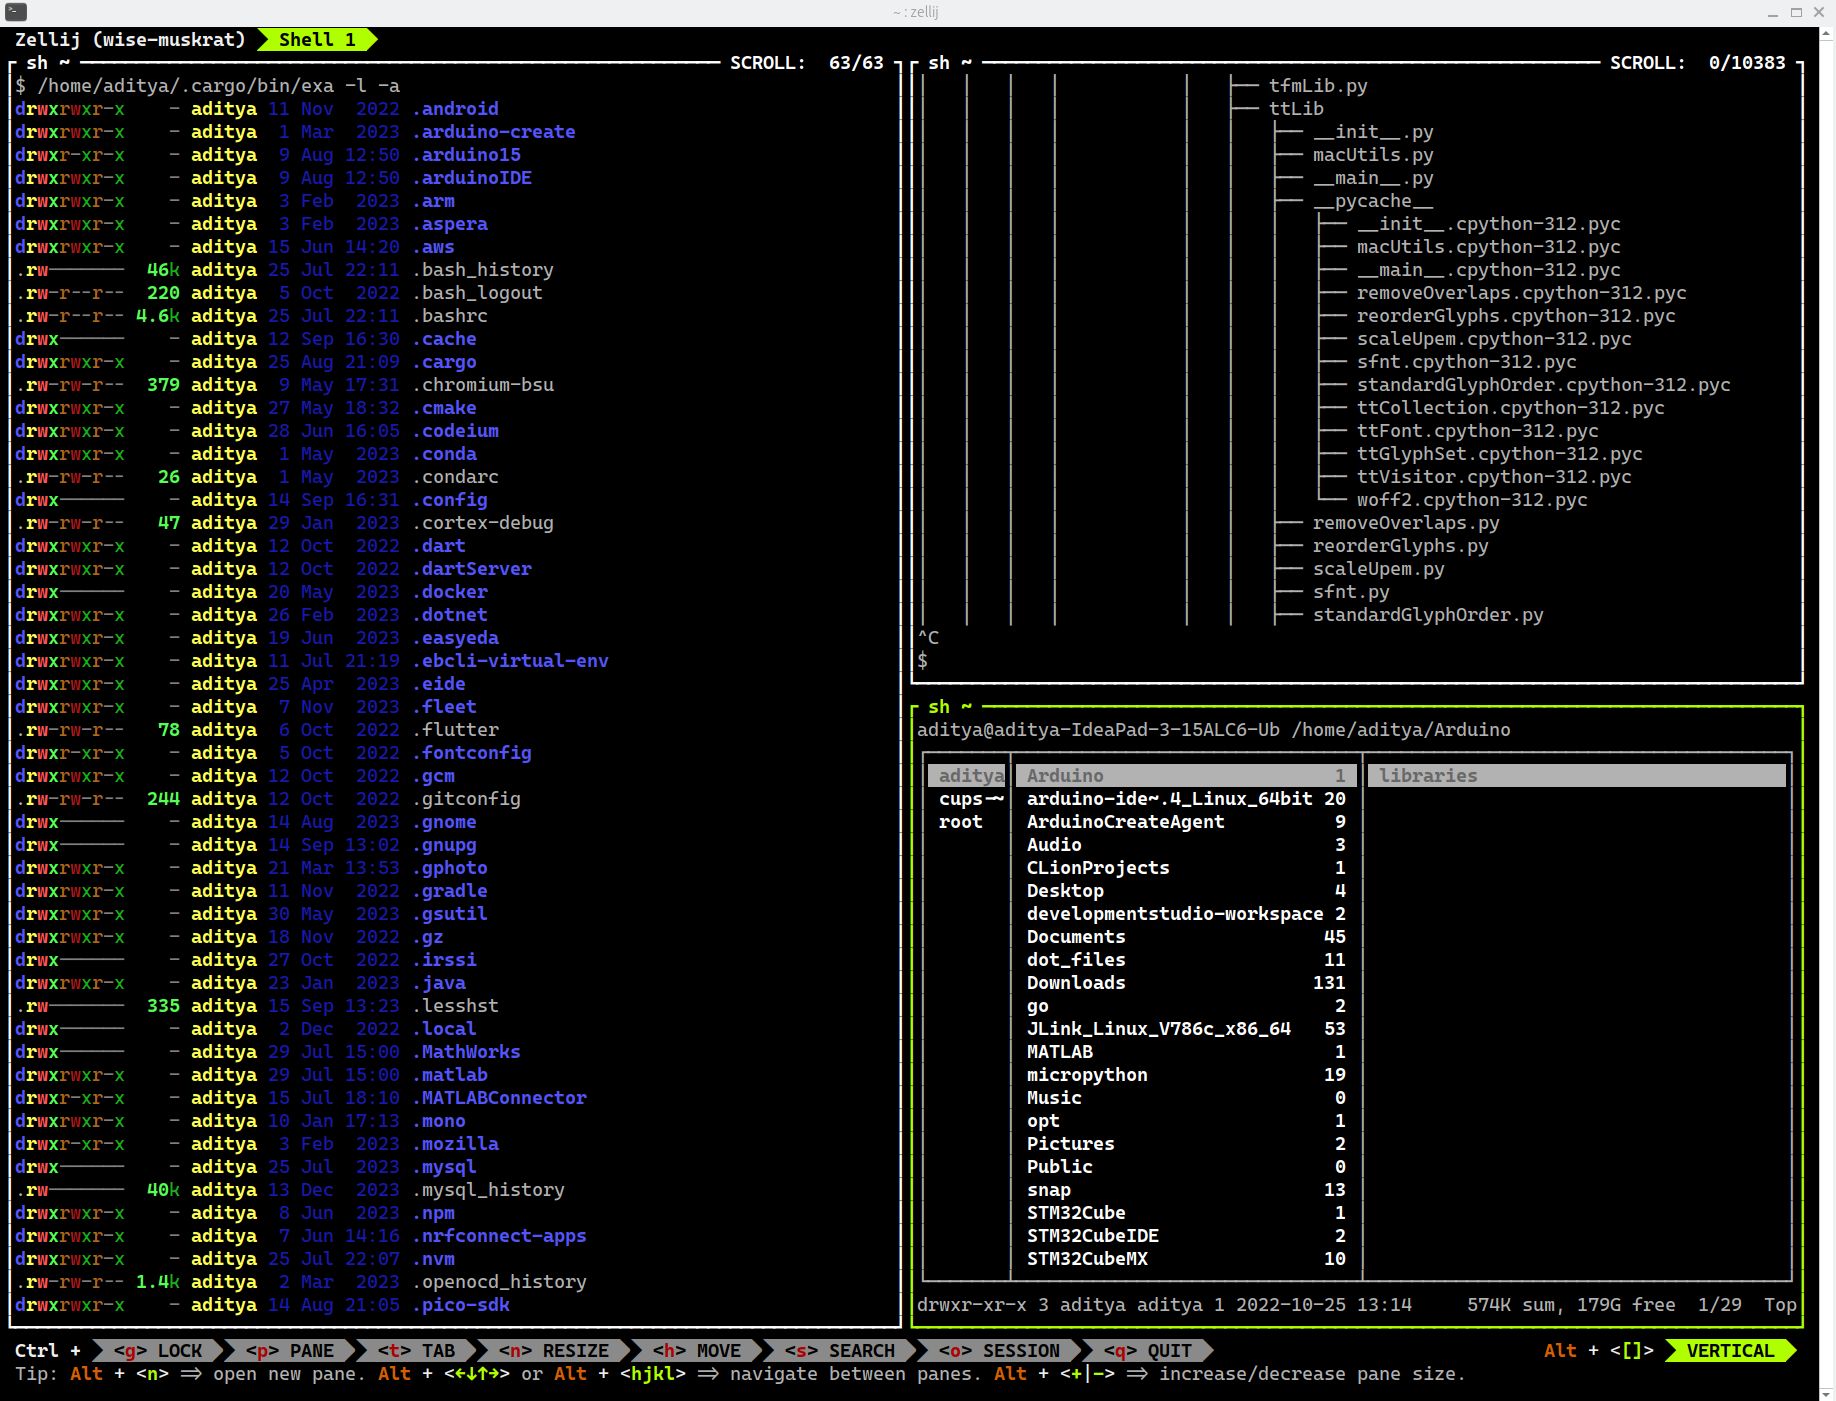
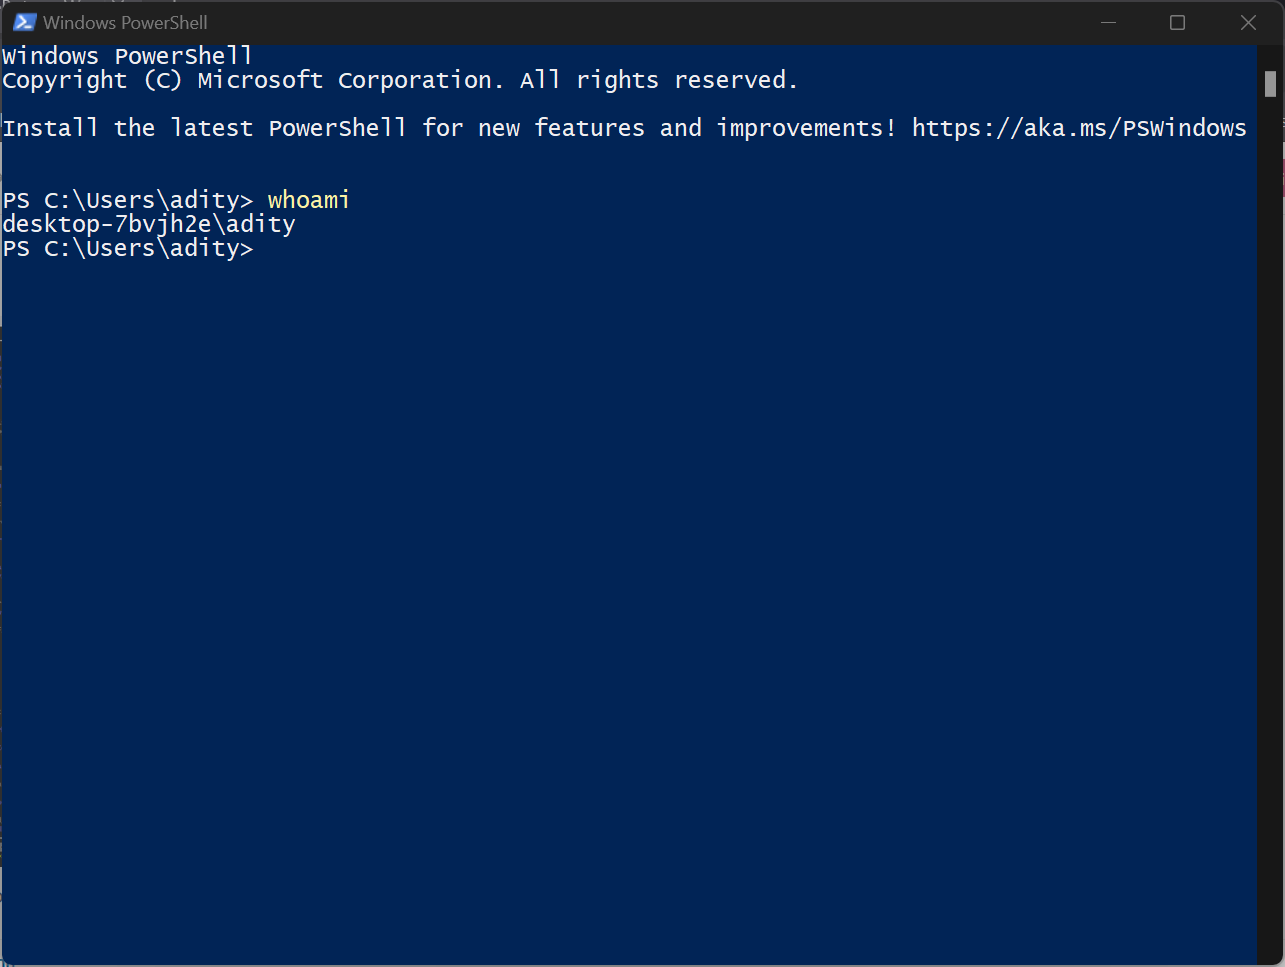
Clicking on either should open a window where you can type commands, as shown. The prompt starts with a filesystem path, which is the working directory of the shell. The working directory is the directory in which all programs invoked by in the shell will execute. We will see more about the working directory later.
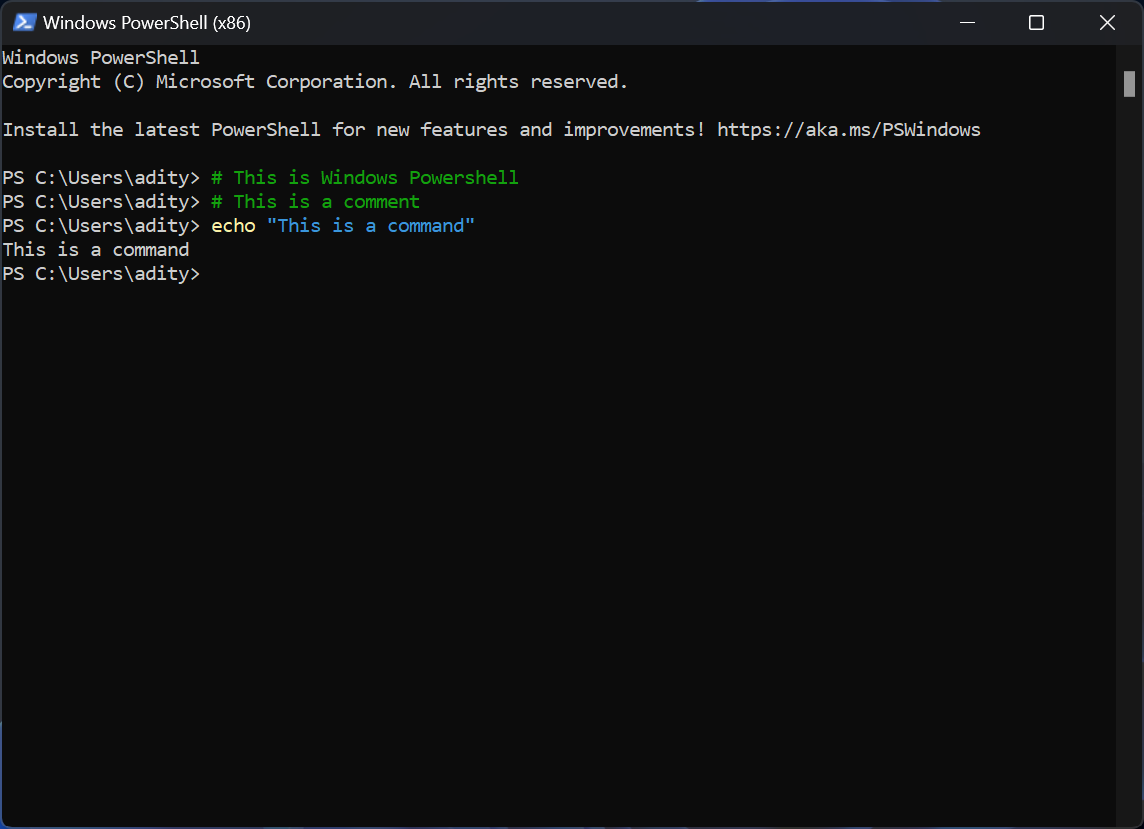
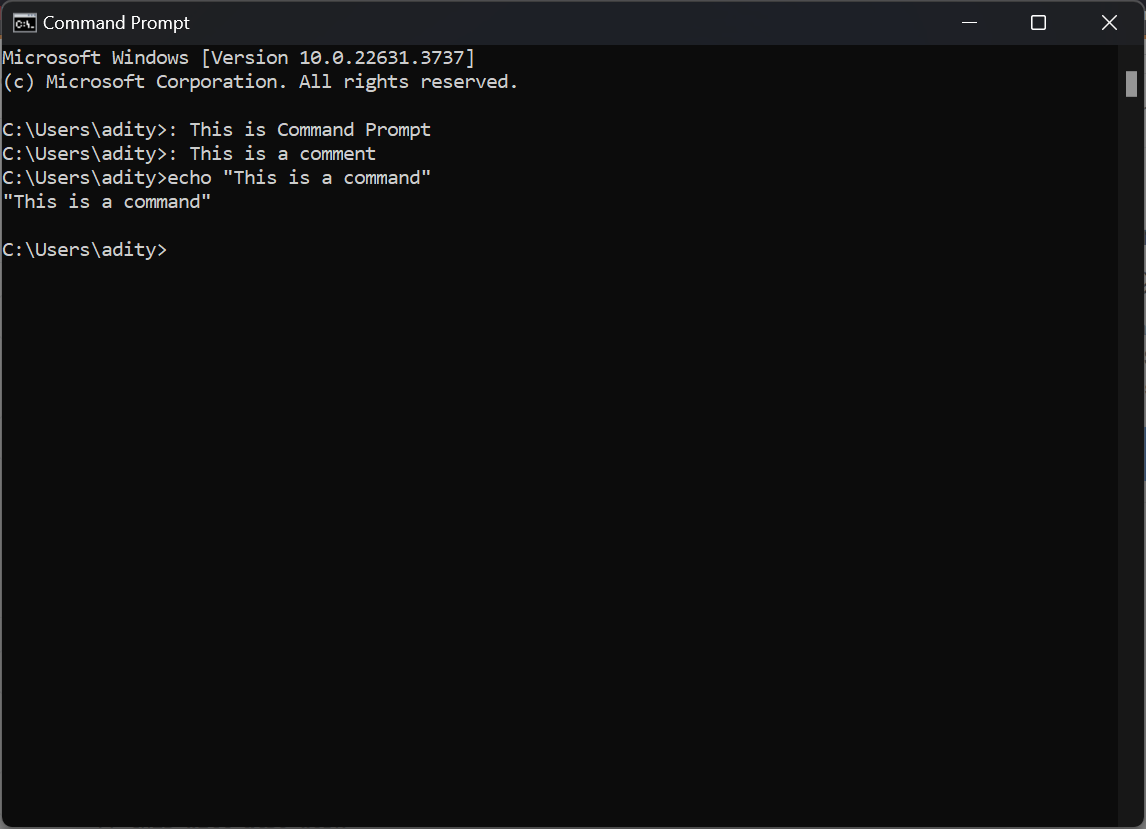
After installing the Arduino CLI, we will run it from Powershell/Command Prompt and perform all the steps that the Arduino IDE performed (compiling and uploading the program, adding libraries, adding support for boards etc.) by typing commands in the shell. For now, try the following commands and see what they do -
Linux (Ubuntu)
Coming Soon!
After you have familiarized yourself with the CLI, we can start downloading and installing the Arduino CLI. Once in place, you can now perform tasks you would otherwise perform using the Arduino IDE (such as compiling, uploading, debugging, getting libraries etc.), from the command line.
Advantages of the Arduino CLI
A quick summary of the Arduino CLI's advantages over the Arduino IDE are given below -
- Flexibility: Integrate Arduino development into your preferred editor or IDE.
- Automation: Easily incorporate Arduino tasks into scripts and automated workflows.
- Granular Control: Perform individual steps (compile, upload, etc.) as needed.
- Remote Development: Compile and upload projects on remote machines.
- Better for Version Control: Easier to manage project files without IDE-specific settings.
Contrasting PlatformIO and the Arduino CLI
As a last step before getting started with the Arduino CLI, let us compare it to PlatformIO, which is a framework that allows you to integrate Arduino development with various editors and provides a CLI tool to manage, build and flash your projects. If you wish to get started with the Arduino CLI as fast as possible, you can skip this section and come back to it later.
For those interested, here's a quick comparison -
- Scope: Arduino CLI is focused specifically on the Arduino ecosystem, while PlatformIO supports a wider range of platforms and frameworks.
- Integration: Both tools allow integration with various IDEs and editors, but PlatformIO also offers its own IDE based on Visual Studio Code.
- Ease of Use: Projects created with the Arduino CLI are more alike to those created with the Arduino IDE that PlatformIO, making it easier for beginners to open them with the Arduino IDE or access them in general. In contrast, PlatformIO offers more features (such as better static analysis), but has a steeper learning curve.
- Community: Arduino CLI is officially supported by the Arduino team, whereas PlatformIO has a large, active community but is maintained by a separate company.
Choose Arduino CLI if you're primarily working within theArduino ecosystem and want a tool that closely aligns withArduino's philosophy. Opt for PlatformIO if you need support for multiple platforms or prefer a more comprehensive development environment out of the box.
Let's now move onto downloading and installing the Arduino CLI on your Operating System.
Getting started with the Arduino CLI
Now that we have gone over what the Arduino CLI is, we can move onto using it, from the installation to creating your first sketch, and compiling and uploading it.
Downloading and installing the Arduino CLI
This section shows how to install the Arduino CLI on your Operating System. The Arduino CLI is downloaded as an executable program namedarduino-cli which can be invoked from the terminal by typing its name.
If you find any step to be missing, or had to follow certain extra steps for your installation, please leave them in the comments down below, as it may help others out.
The system path is a system variable that stores a list of paths in your file system that your OS uses to search for programs when they are invoked from the terminal. Whenever a program (such asarduino-cli, curl etc.) is invoked from the terminal, the Operating System searches the paths specified in the system path to find the program. If it is not found, the terminal reports the error and fails to execute the program.
Windows
Linux (Ubuntu)
Windows
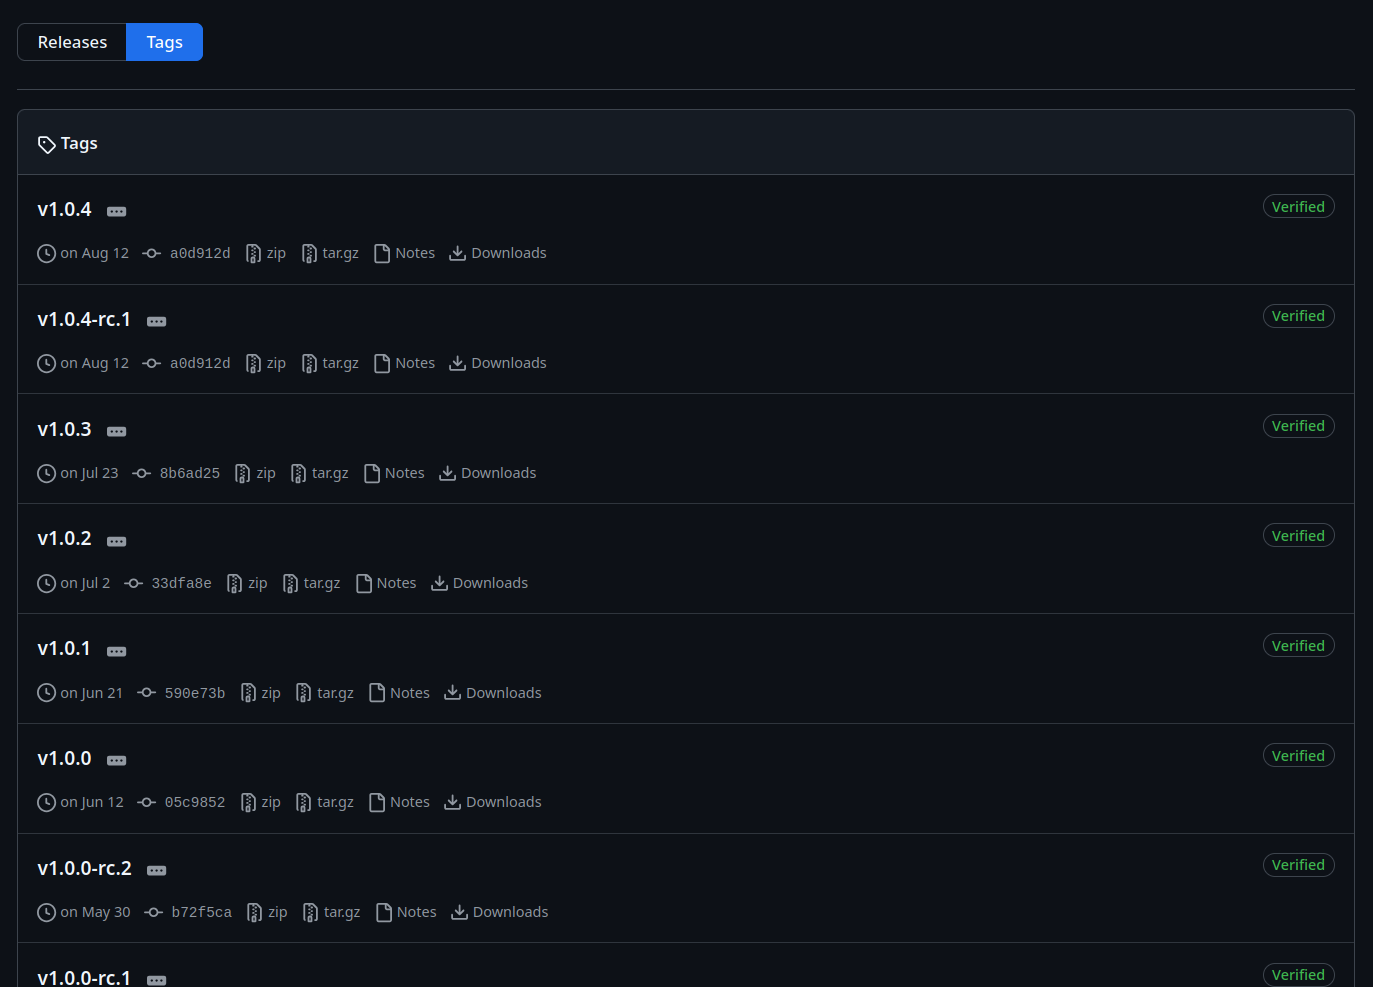
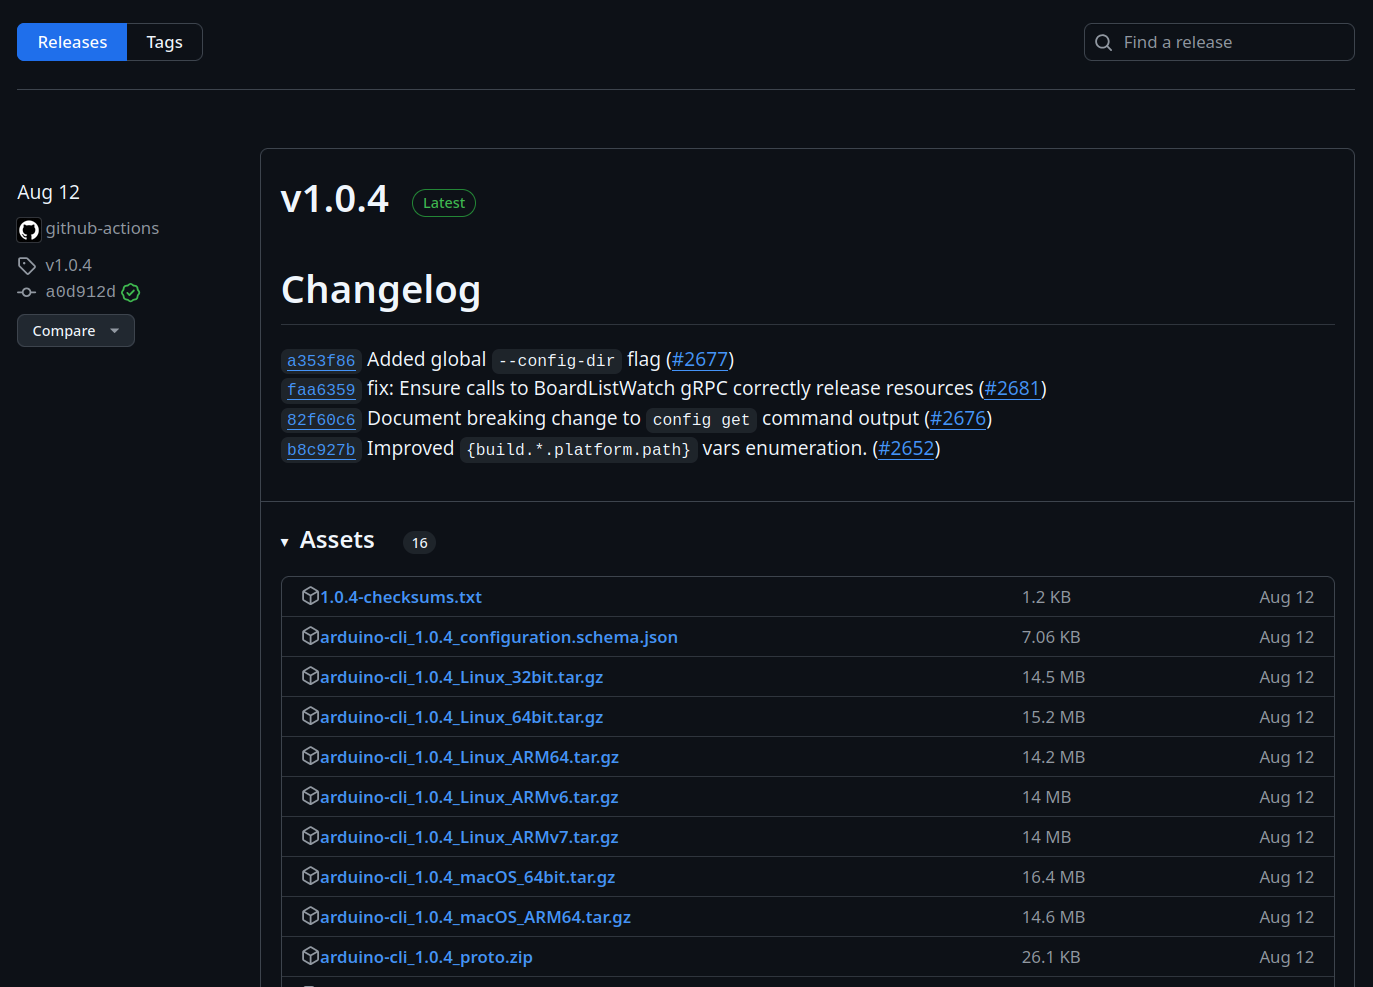
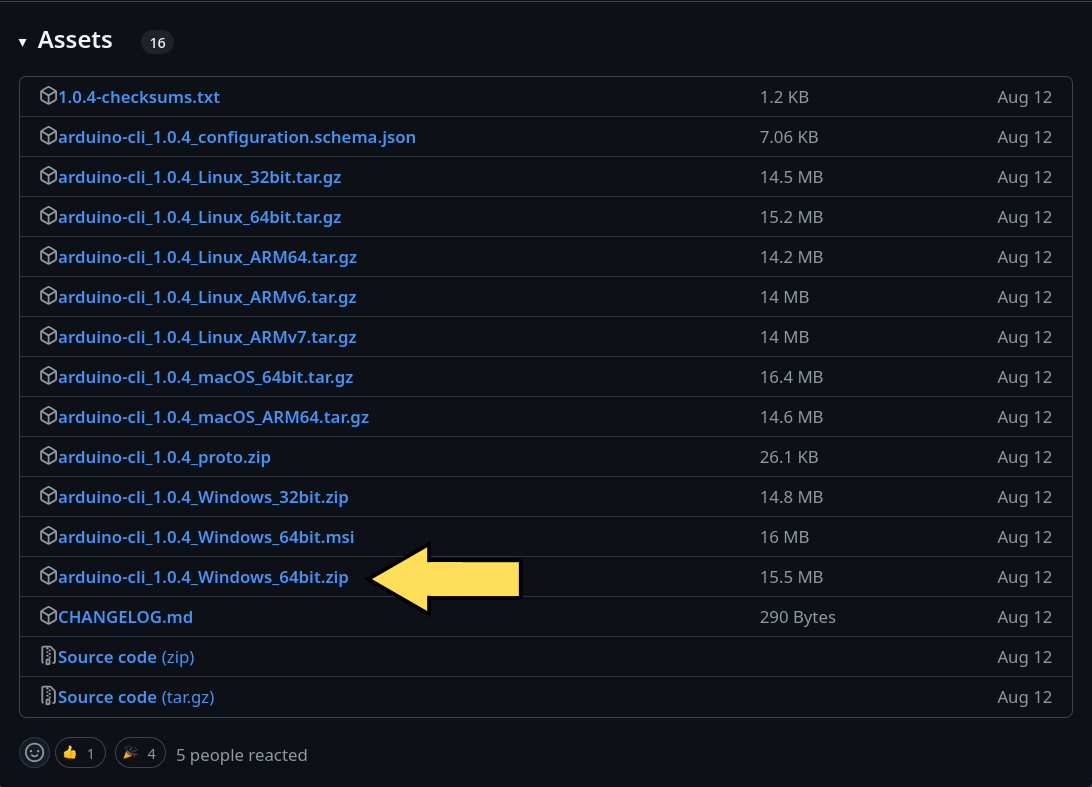
To install the Arduino CLI on Windows, you can download the pre-built binary from here on Github. The page contains various stable releases, of which the topmost version is usually the latest (the latest release is marked in the Releases tab). Each release will have multiple Assets for various operating systems, so make sure to get the correct version for Windows.
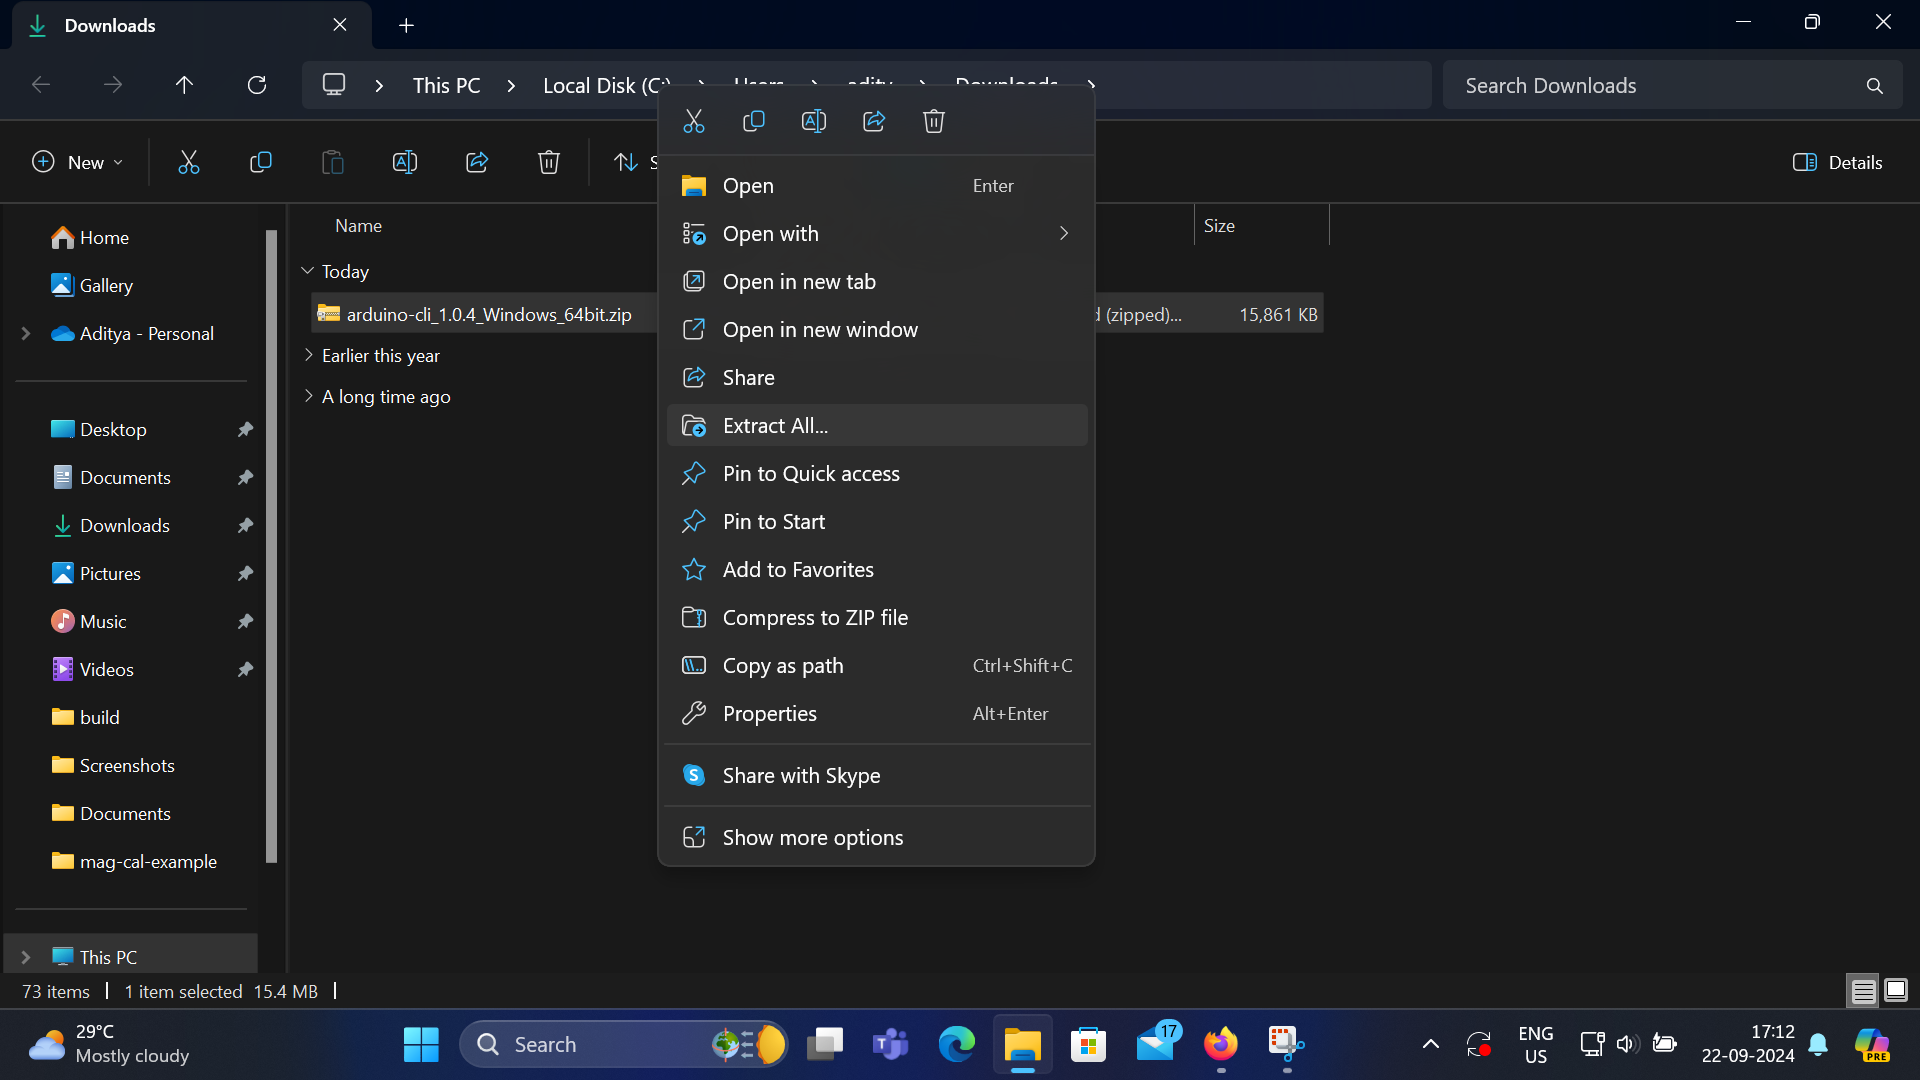
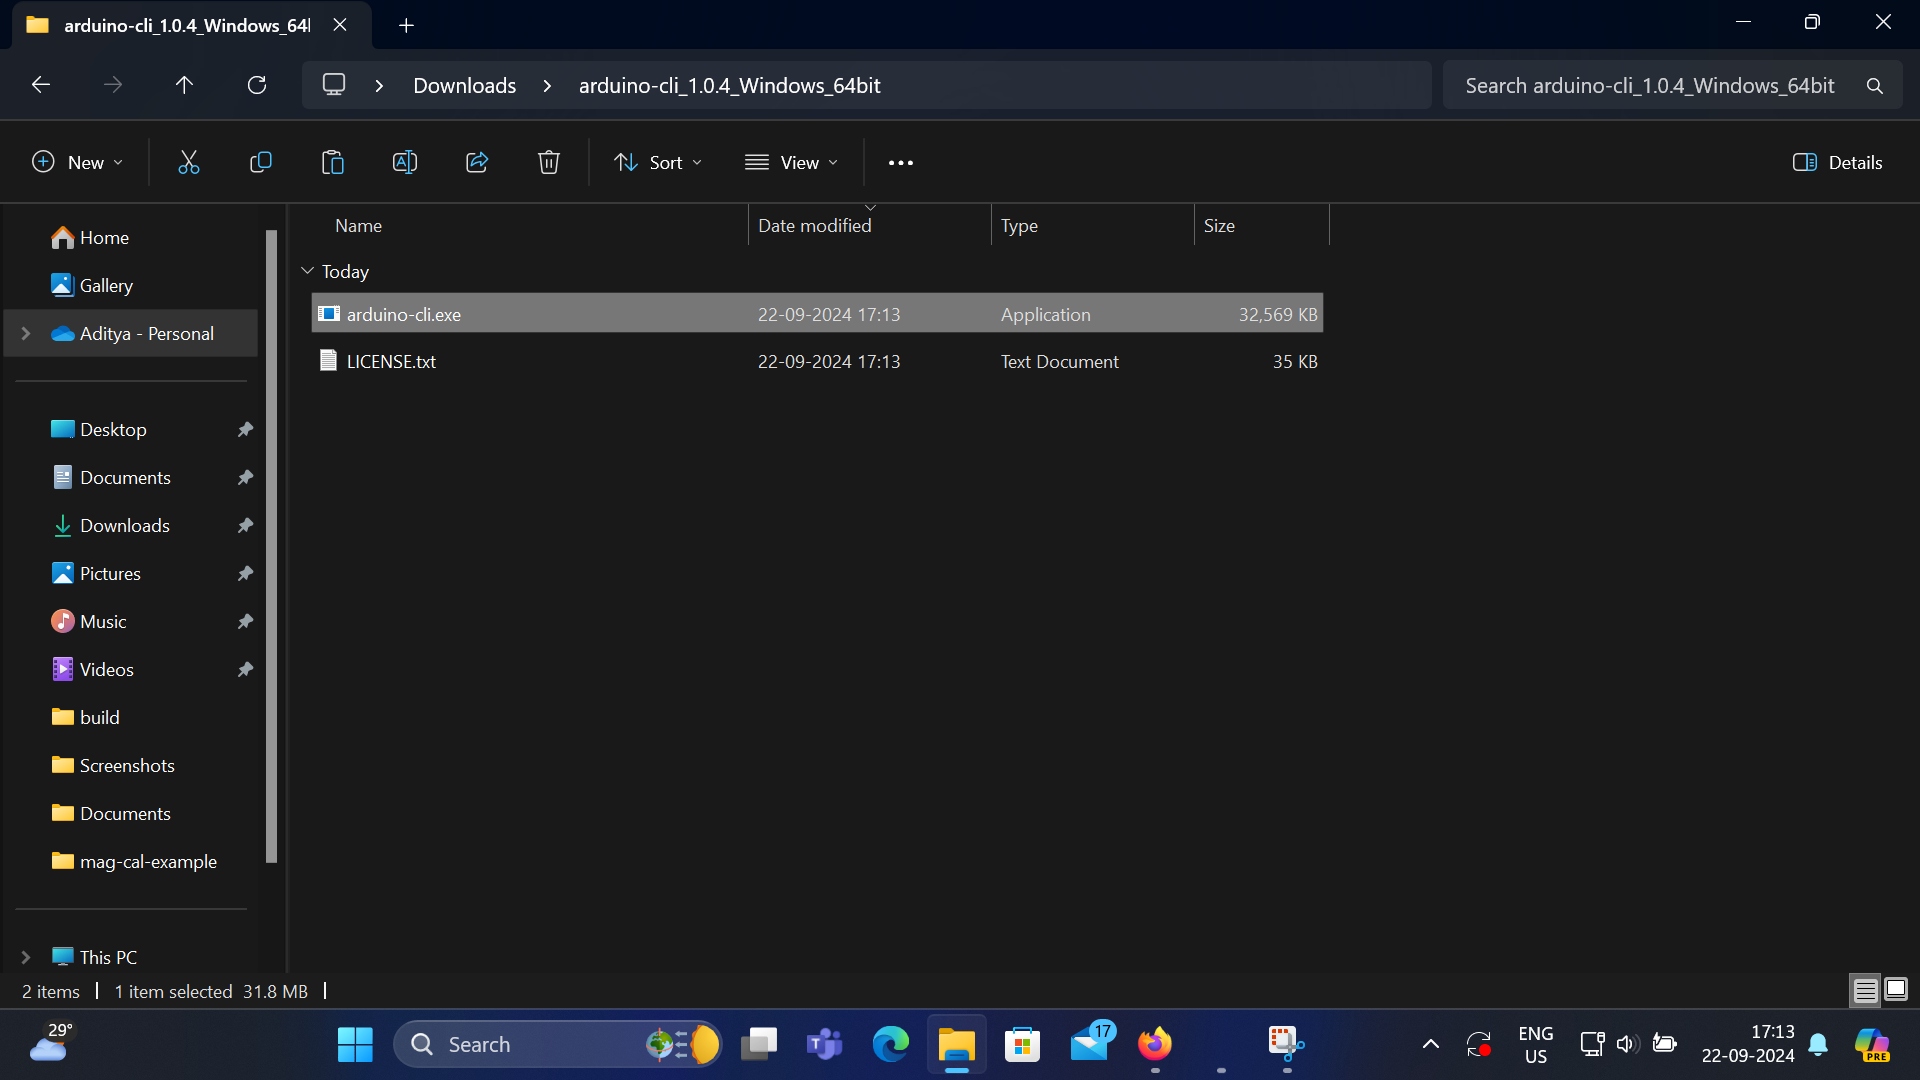
The download is a zip file (compressed archive) that must be extracted (you can use WinRAR or the builtin extraction facility in the Windows File Explorer). The extracted directory will contain a LICENSE.TXT text file and thearduino-cli executable.
After doing so, you can move the program to a location on the system path, or add the location of the program to the system path. If neither of these steps are followed, then the program can only be run from the terminal by supplying its complete path. The instructions to view/update the system path and add the Arduino CLI to the system path are given next.
Viewing and updating the system path
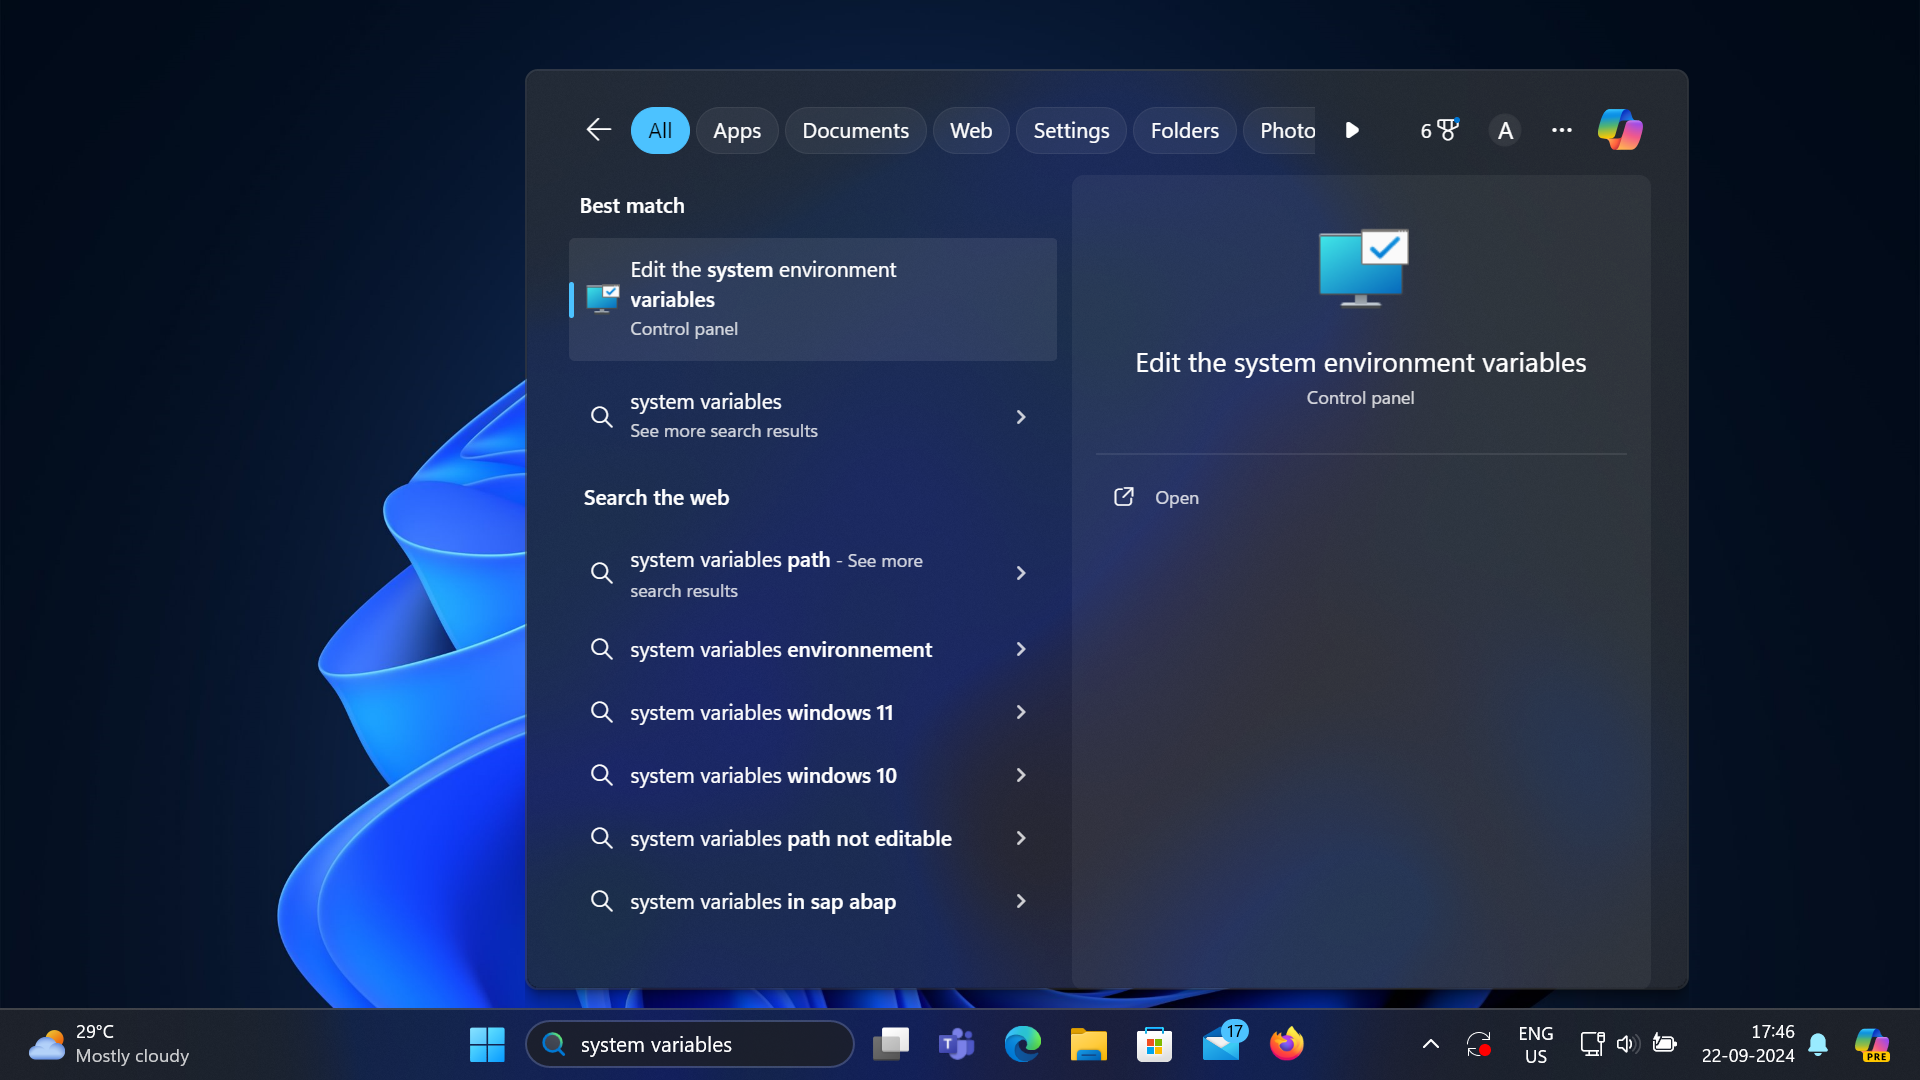
On Windows, you can view and update the system path from its menu in the control panel. To open the control panel, first open the Windows search bar using the "Win+S"keyboard shortcut, and search for "system variables". Next, click the option named "Edit the system environment variables", as shown. Depending on your PC settings, you may require administrator privileges to do this.
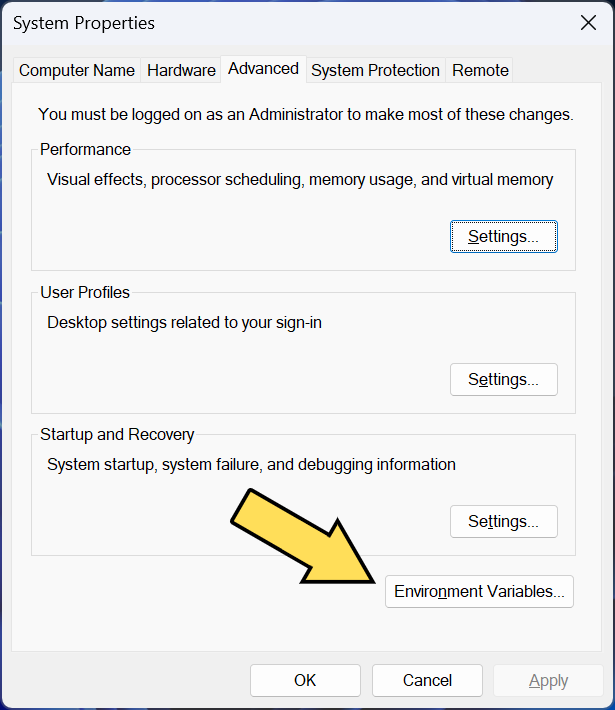
Once opened, click the button labelled "environment variables", which should open yet another window that contains the various system variables, one of which is the path.
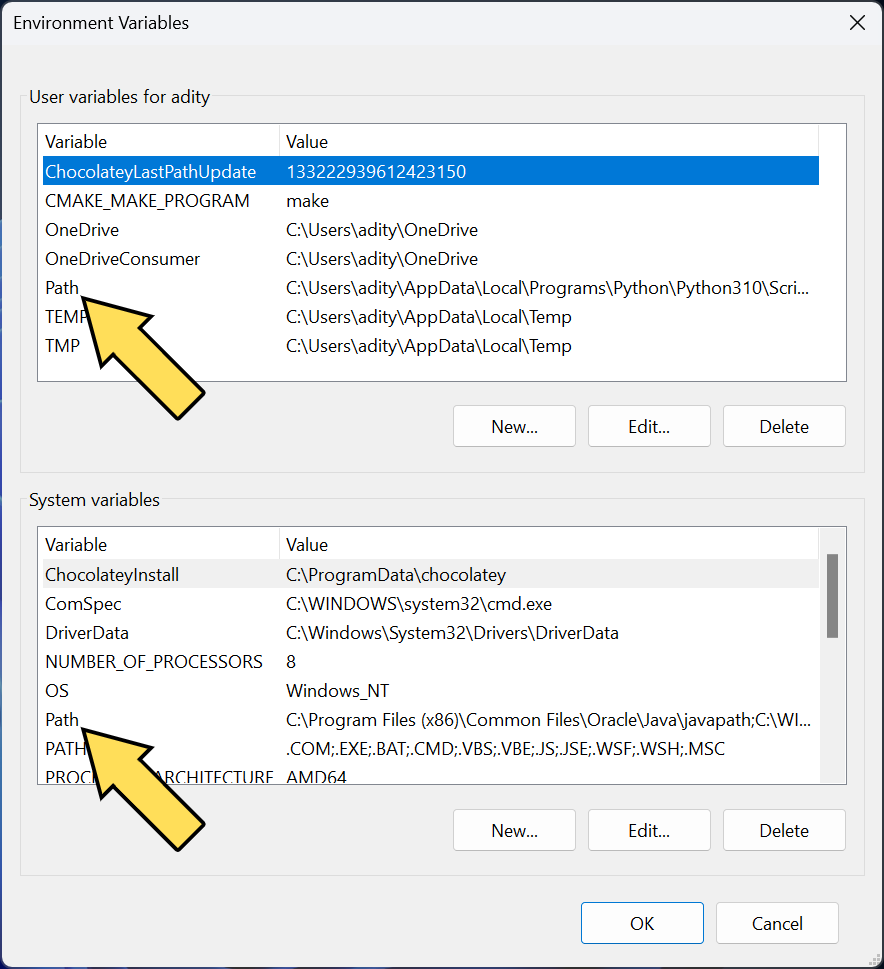
The path variable is present for the user as well as globally, and you must choose which one to edit depending on your system. Generally, it is better to choose the user's path.
When searching for a program, the Operating System first checks the paths in the global path variable and then the user's path (if it could not be found). As a result, adding the Arduino CLI's path to the global system variables allows all users to use the CLI, while adding it to the user's path variable only allows the currently signed-in user to use the Arduino CLI (other users can use it too, but need to enter the full path before the program name). Modifying the user's system variables usually does not require administrator privileges, while modifying the global system path definitely requires administrator privileges.
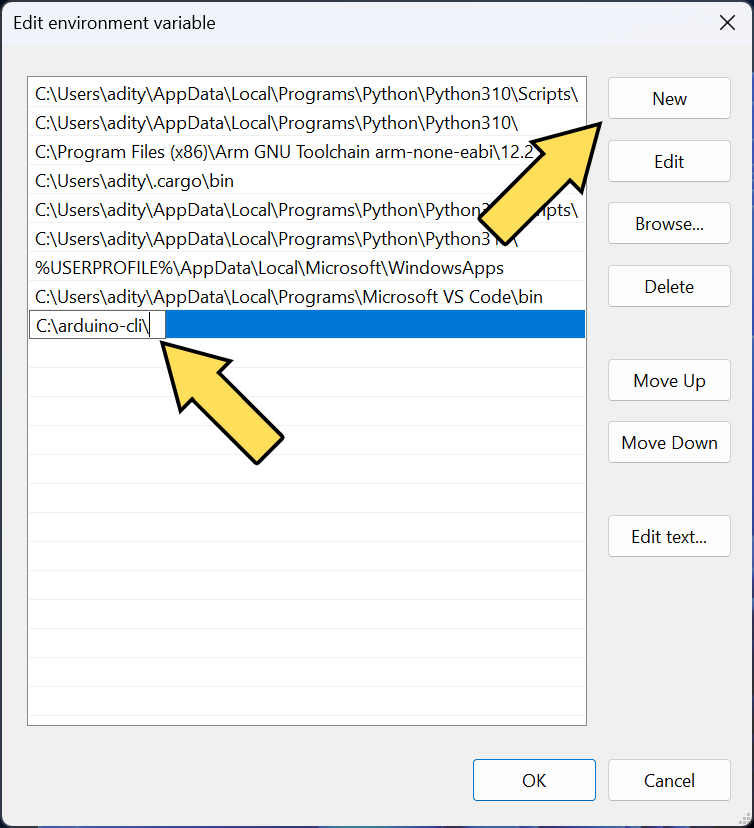
Select the variable named "path" and click the button labelled "Edit". This will open yet another window that contains the value of the path formatted as a list. Here, you can add new paths, remove old paths, or update existing paths. For now, paste the full path (starting with drive name, such as "C://", and ending with the name of the program's parent directory), as shown -
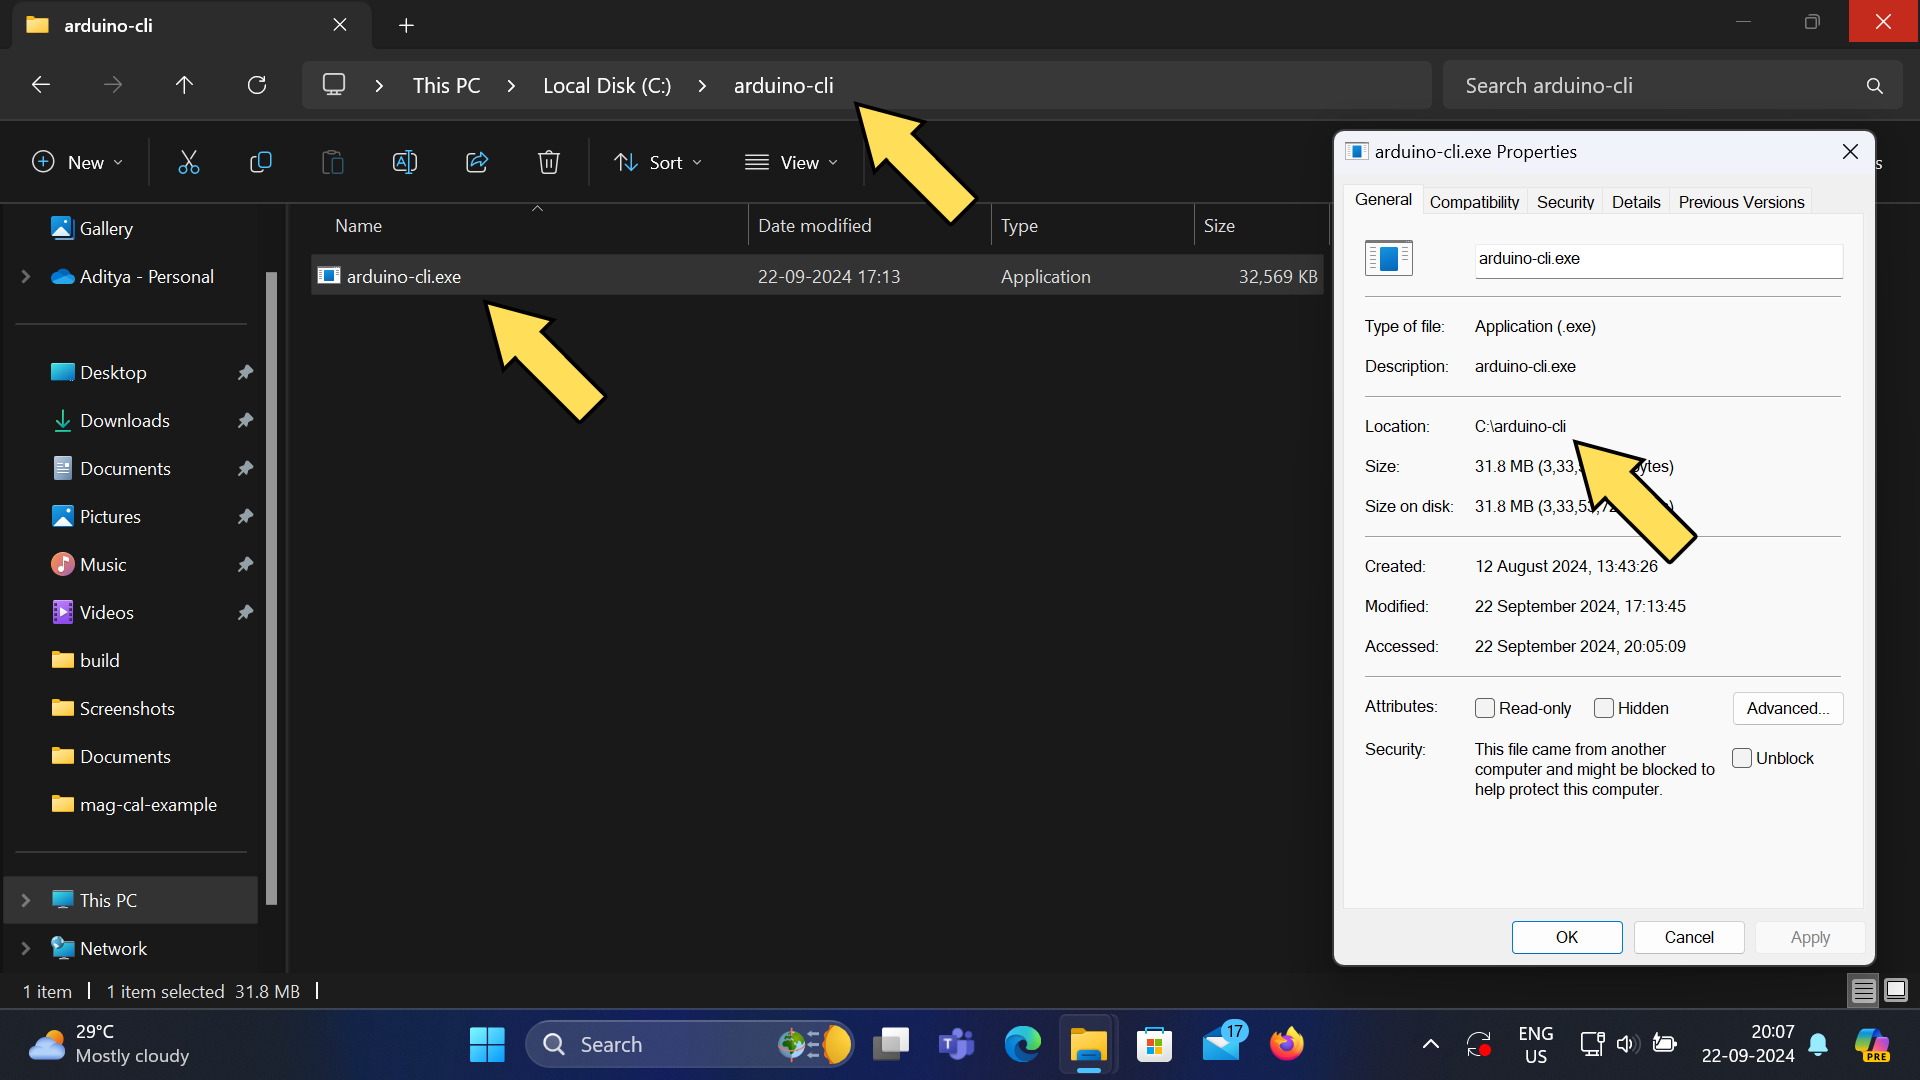
Next, move the Arduino CLI to the path that you specified, In my case, I have moved the arduino-cli program to "C://arduino-cli".
You should now be able to invoke the Arduino CLI from cmd/powershell without specifying its complete path.
Installing using CUrl
Alternatively, if you have the git bash shell installed on your system along with the curl program, or you are using WSL, you can install the Arduino CLI using its install script by running the following commands. This also allows you to install the nightly version of the program, which is the latest version of the Arduino CLI that is still in development (as a result, it will have the latest features at the cost of potential bugs and performance issues).
The script uses the curl program to get a script from Github, which is then piped into the sh program, which executes it. The script contains the commands to download the Arduino CLI and install it. You can see the contents of the script by visiting the link after the -fsSl flag on your browser. The location of the arduino-cli binary is determined by the value of the BINDIR environment variable. If the BINDIR variable is not set, the binary is installed in the bin directory of the current working directory (the bin directory is created if it does not exist).
To set the value of the BINDIR, variable, run the following command before running the install script for the Arduino CLI -
To view the contents of the BINDIR variable, run the following commands -
On Windows, you can install the Arduino CLI by downloading the pre-built binary from Github and adding it to your system path (this is the easiest way and allows you to get any version), or by using the install script (this does not require the GUI at all, but requires either WSL, Git Bash or Cygwin; it also allows you to get any version, including nightly versions).
Linux (Ubuntu)
Coming Soon!
Understanding the build process: Cores, Boards, Libraries and Toolchains
While we have successfully downloaded and installed the Arduino CLI, we still can not still use it to create sketches and compile/upload them. Let us see why.
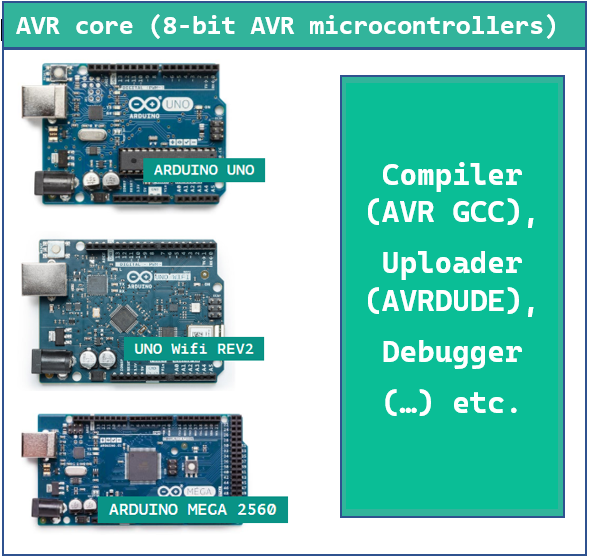
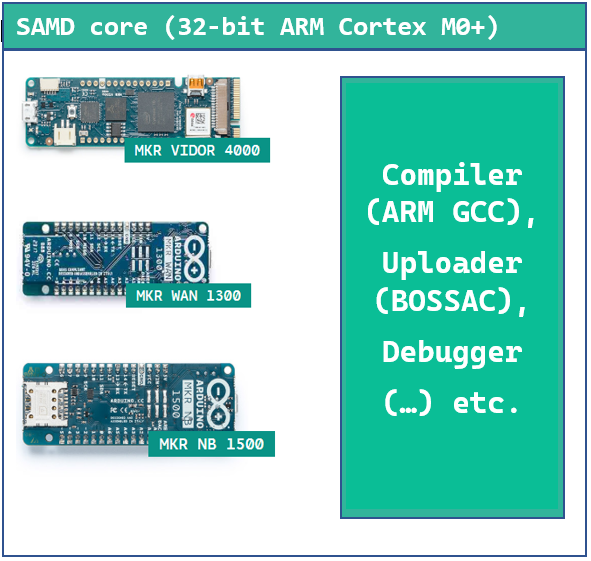
Despite being a tool itself, the Arduino CLI requires other tools to function and perform its various tasks. These tools are specific to your target board. While there are many different boards, each built around a different microcontroller, several boards may share the same chip architecture and form a set orfamily. For example, the UNO R3 and Mega are part of the AVR family while the Zero and MKR1000 are part of the SAMD family. Each of these families requires its own specific tool-set for tasks like compilation, uploading/downloading, debugging, a Programmer & bootloader etc.
Without having the correct tools installed, the Arduino CLI can not compile your sketch or upload it to your board.
The Compiler is what converts the sketch from high level human readable code (which you write) to low level instructions which the microcontroller on your target board can read and execute. It generates binary files from your source code.
The Uploader/Downloader is a program which acts as an intermediary between your PC and the target microcontroller. It is allows you to manipulate the contents of the microcontroller's ROM and is used for transferring the program from your PC to the board.
The Debugger is a program/tool which can be used to examine the state of your program while it is running on the microcontroller. It can be used to find and remove errors from your program and in some instances, even optimize it.
The Programmer is a physical device (unlike the other 3) which is used to burn the program onto the microcontroller's ROM, bypassing any and all data previously on it, including the bootloader.
These are collectively referred to as a Core/Architecture/Platform. The Arduino CLI makes it incredibly easy to set them up.
To get the list of cores currently installed at any point of time, enter the following command-
This will list all the cores you currently have installed along with their IDs, current version and latest available version. If you do not have any cores installed yet (like me), it will output "No platforms installed".

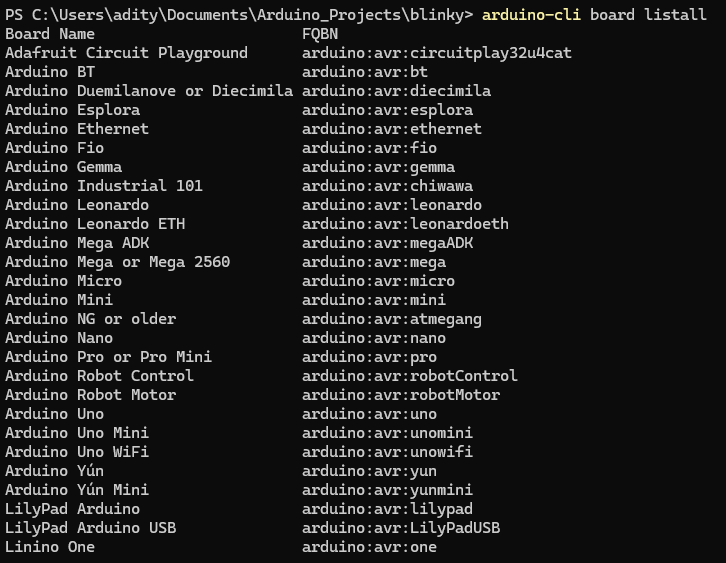
A list of installed boards can also be individually displayed with the following command -
This lists all the installed boards individually, along with their Fully Qualified Board Names (The official name used to denote them). If you do not have any cores installed yet (like me), it will be empty.

To install a core along with all its dependencies (such as compiler, debuggers etc.), enter the following command. Arduino regularly updates its list of available cores to match the boards available in the market.
The above command installs the core for AVR boards (this includes the Arduino UNO R3). You can change the core that gets installed by changing the identifier given at the end.


To upgrade all installed cores to the latest version, you can use the following command-
Despite being a tool itself, the Arduino CLI requires other tools to function and perform its various tasks, which are specific to a family of boards. The Arduino CLI includes commands to install, remove and manage packages for these families of boards, which includes all the tools necessary to use them.
In the coming sections, we will also see how to use the Arduino CLI to add support for third party boards and cores and libraries. For now, let us move to creating our first sketch, compiling it, and uploading it to an Arduino.
Creating your first sketch using the Arduino CLI
Now that we have set up the Arduino CLI, let us use it create our first sketch. In this example, we will use the blinky sketch because of its simplicity, and the fact that it works on almost all Arduino boards right away, without needing external components or special configuration. This allows us to focus more on the Arduino CLI and less on the program. The commands used will also assume that you are using an Arduino UNO R3, and you will need to change them slightly for use with different boards (this will be shown as well).
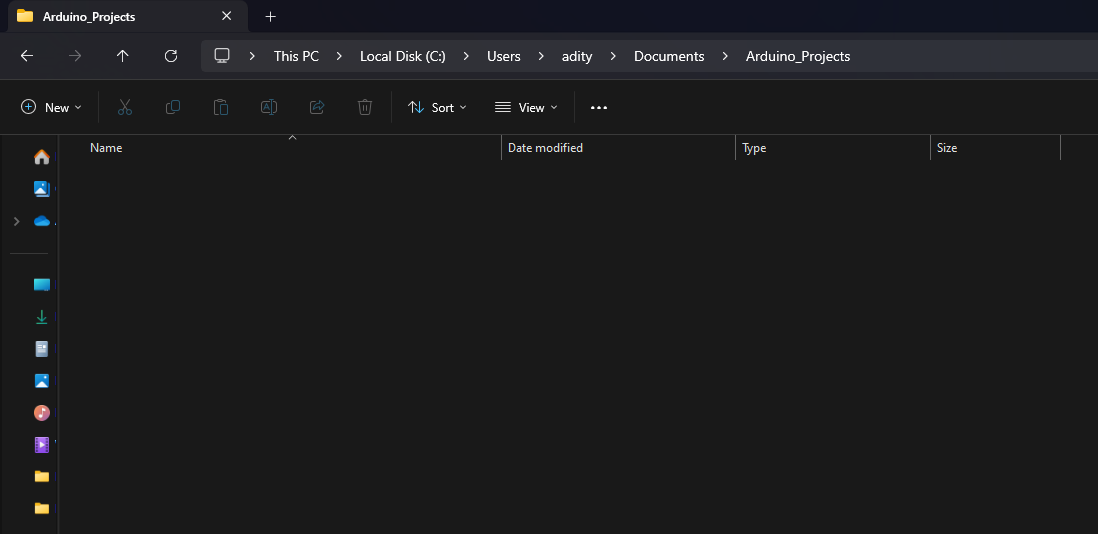
All the projects shown in this example will be present in a singleProjects directory, as shown below. To keep everything easy to follow, I have named it "Arduino_Projects". Do not confuse the Projects directory with the Project directory. The latter contains your source code, compiled binaries and other project-specific files, while the former contains multiple such Project directories.
Next, open the shell with the Projects directory as the working directory and run the following command to create a new sketch -
This will create a new directory named "blinky" in the projects directory, which will have a single file named "blinky.ino" inside it -
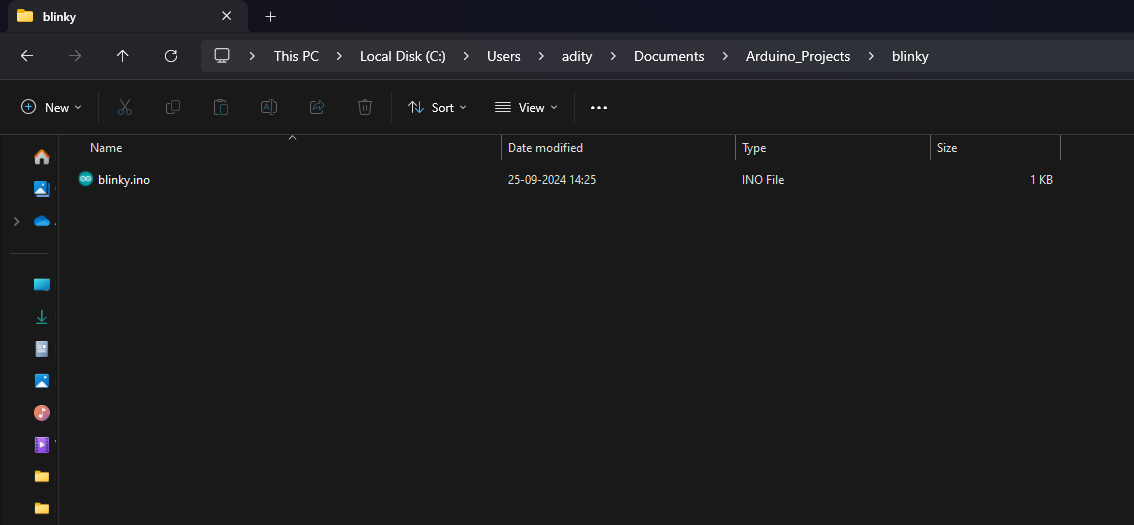
Note that the Windows File explorer has already added the Arduino icon beside the file, which happens because I have the classic IDE installed. Even if this does not happen with you, it is perfectly normal.
Now, open the blinky.ino file in your favorite editor, and paste the following code into it -
And that's it! You can save and close the file. The program is complete.
Compiling the program
After creating the sketch, let us see how to compile it and make it ready for uploading. Type the following command with the working directory set to the project directory -
*Note: --fqbn can also be replaced with -b without changing the meaning/functionality of the command.
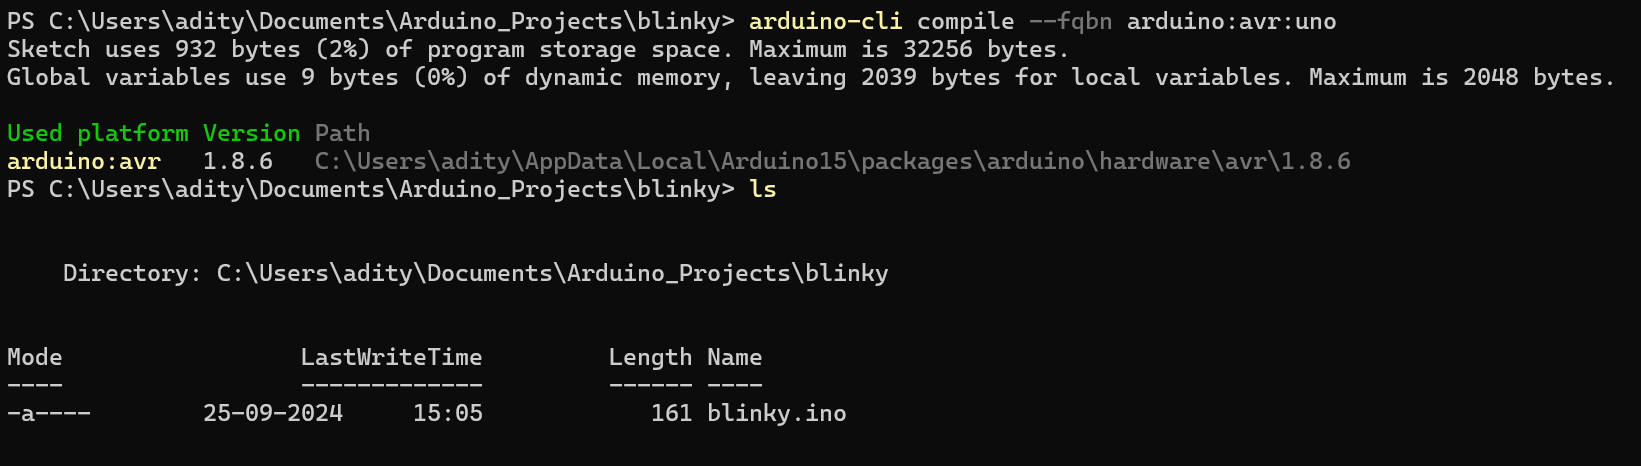
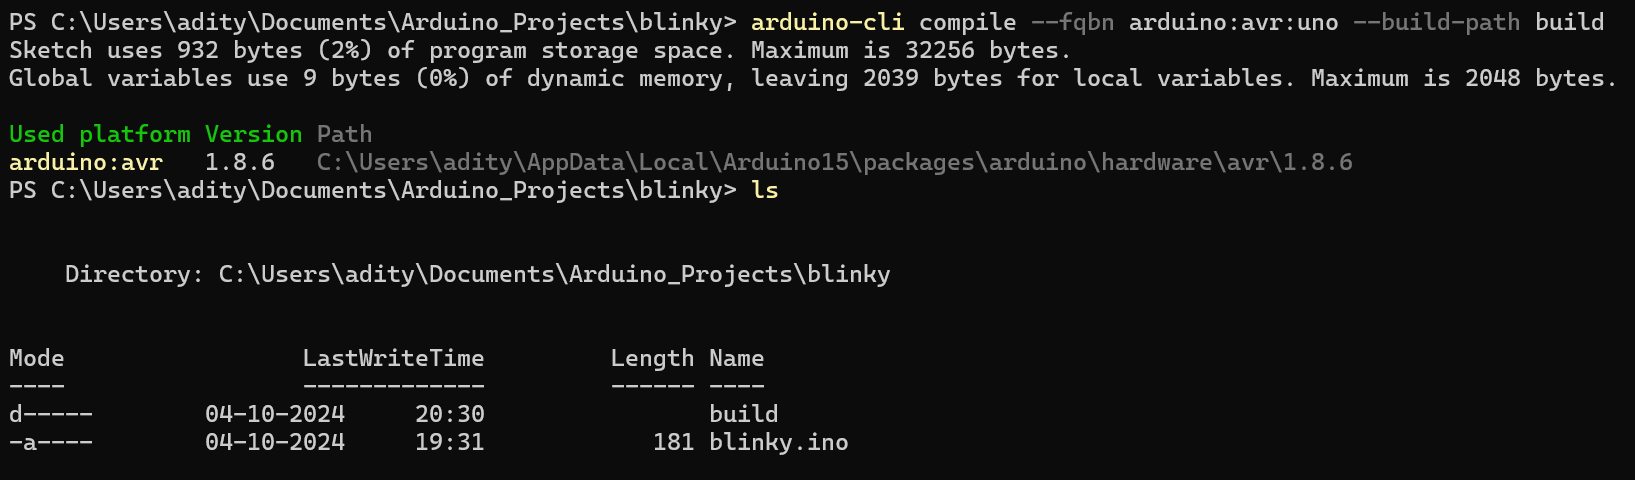
Interestingly, after running this command, the output of the compilation step is stored in a temporary directory (this is provided by the Operating System, and depends on your exact OS and configuration). To force the Arduino CLI to keep the output in the current directory, update the command as shown -
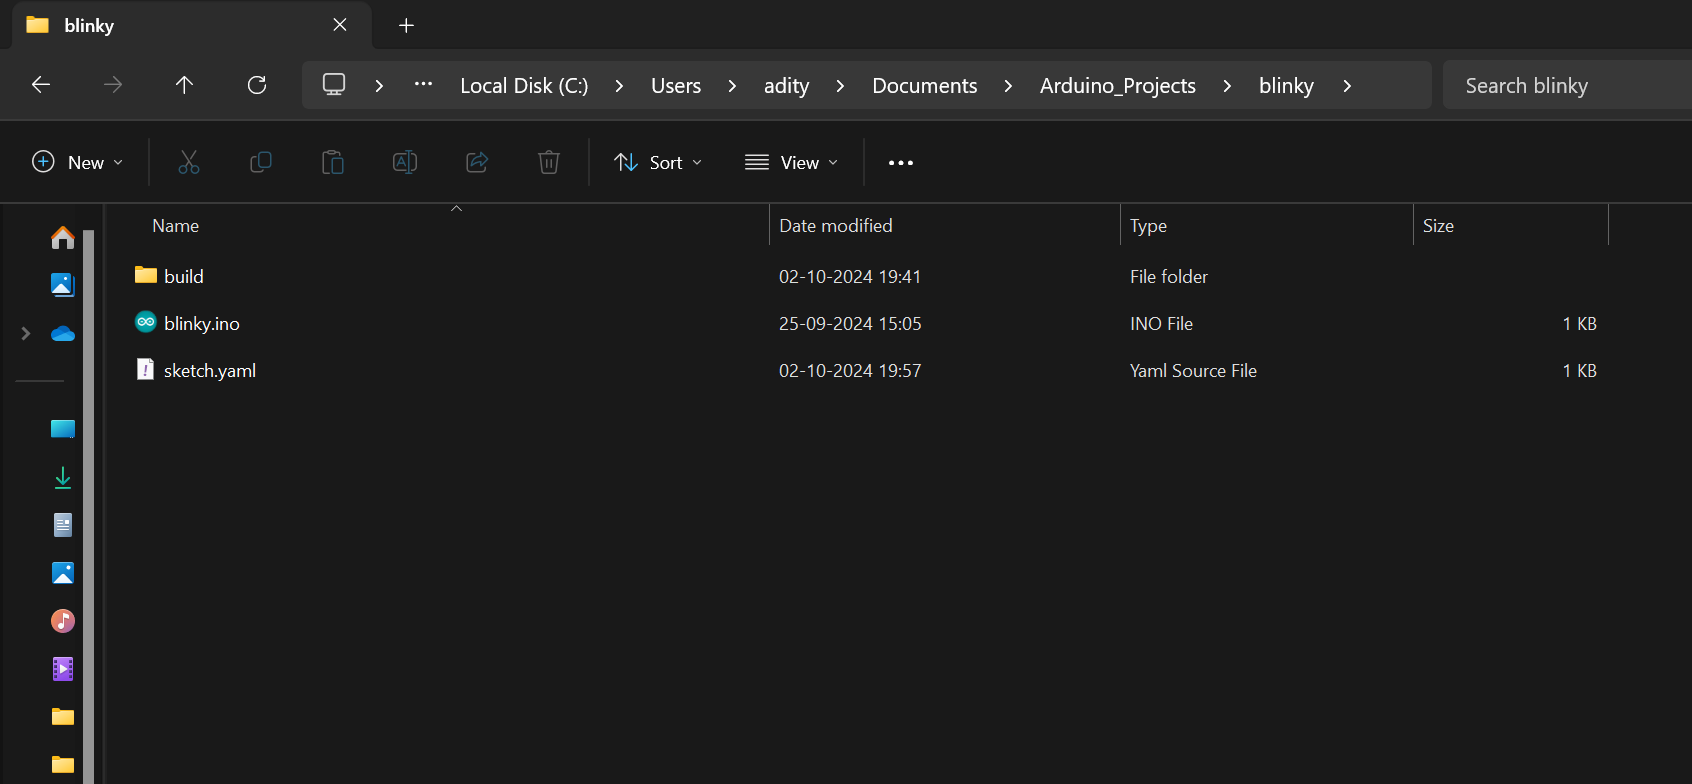
This creates a directory named build in the project directory, which contains the hex, bin and elf files that get uploaded to the Arduino's memory -

Uploading the program
To upload the program, connect your board to your PC and run the following command -
*Note: --port can also be replaced with -p without changing the meaning/behavior of the command.

If you used the --build-path flag in the compilation step, then you will have to add the --build-path flag to the upload command as well as shown -
The Arduino CLI also offers a command to find attached boards (similar to how the IDE automatically detects if an Arduino Board is attached to your PC, and also mentions its port). You can use this command to find the serial port which your device is connected to.
Compiling and uploading together
Quite often, the compile and upload steps need to be performed together. For this, run the following command -
The above command uses the compile sub-command of the Arduino CLI, but adds the --upload and -p flags to let it know that the program must be uploaded after being compiled.
Attaching the sketch to board/port
The arduino-cli also gives you the option to "attach" a sketch to a port or a board. By doing this, you don't have to repeatedly specify the port & fqbn of the target board. This is especially helpful when you might be using multiple boards simultaneously, as it reduces confusion by removing extra steps and the need to repeatedly verify if the given parameters are correct.
To do this, enter the following command. Since I am using an Arduino UNO, I have specified the same in the example, however you will have to replace it with the fqbn of your target board.

To attach the sketch to a serial port, just use the following command -

By doing this, you can compile your sketches without specifying the "--fqbn" and "-p" flags.
If you now go and check the contents of your program folder, you will find that a yaml file has been created, named sketch.yaml which will contain the target board and target port for which your sketch will be compiled and to which it will be uploaded to -
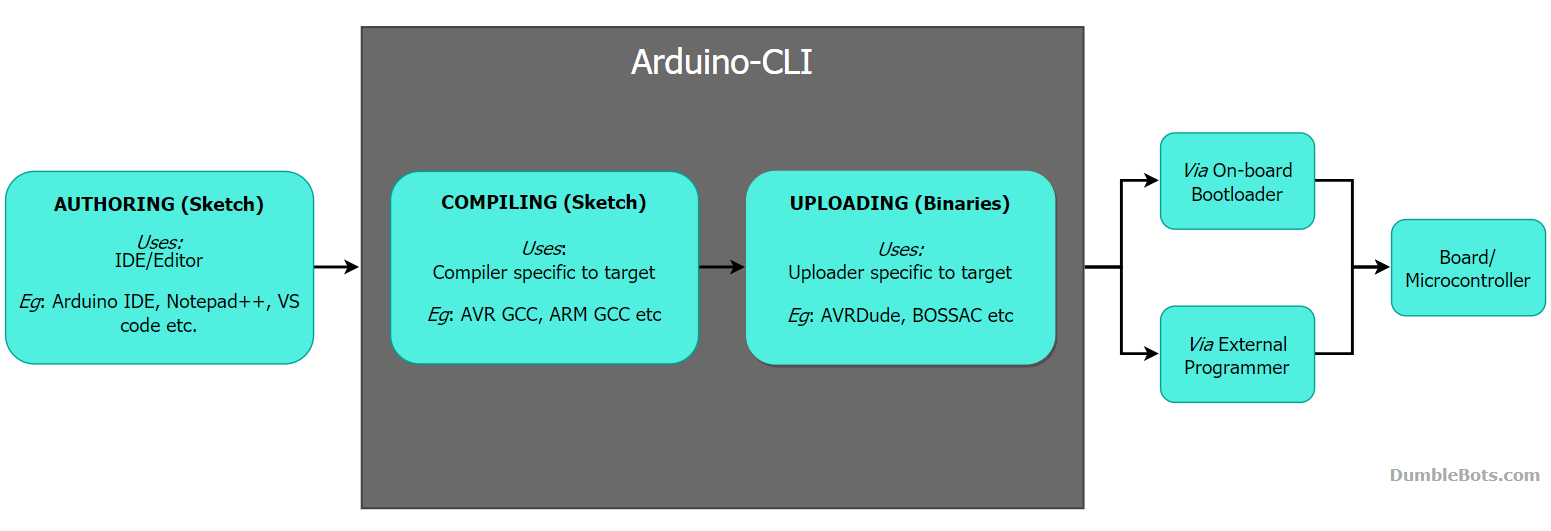
Visual summary of the Arduino CLI's flow
Extending the build system
Now that we have set the Arduino CLI and used to it compile our first program, let's see how to perform the next most important task of the Arduino IDE from the Arduino CLI - installing libraries.
To get a list of the currently installed libraries, run the following command (since Arduino libraries are not specific to a project, you can run this command from any directory) -

Initially, the command should output "No libraries installed." to indicate that not libraries are installed.
To search for a library with a search string (as in the Arduino Library Manager), run the following command -
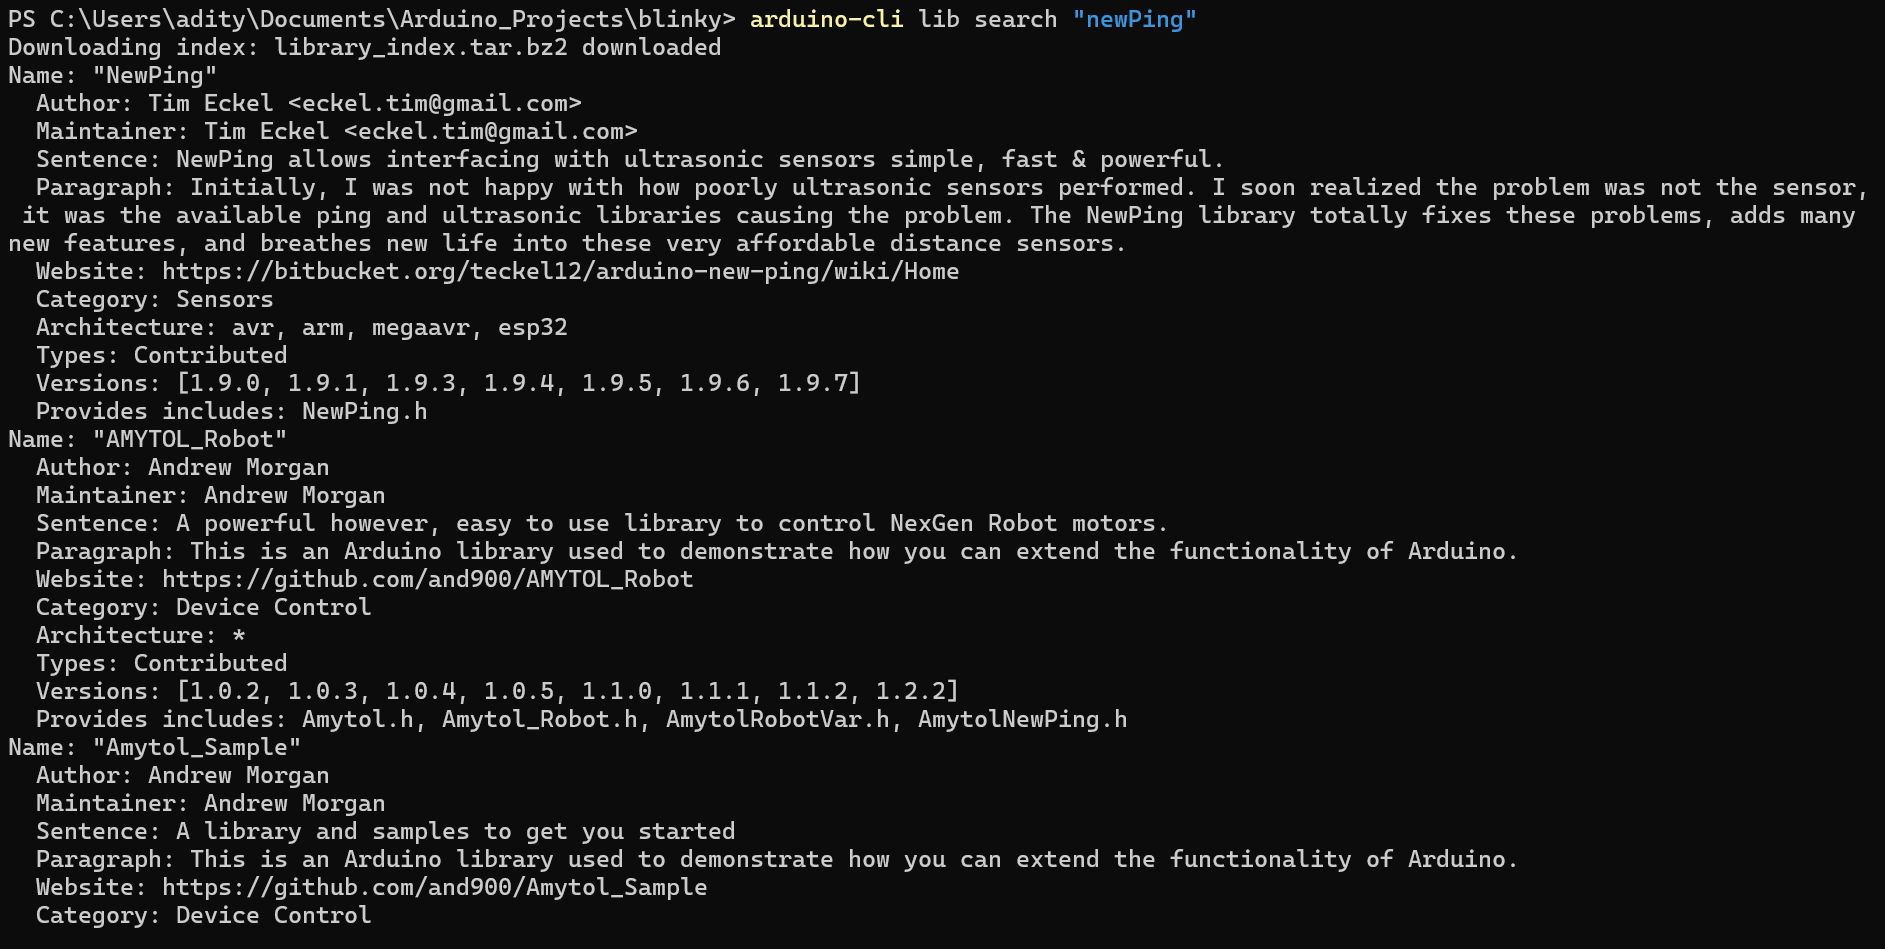
In the image shown above, we search for the "newPing" library, which is used to drive common ultrasonic distance sensors. To download a library, run the following command -


Now that we know how to install libraries, let's see how to add support for third-party boards.
Installing party cores
The arduino-cli can also be used to compile and upload programs to third party boards (not officially distributed by Arduino). To get third party cores the same method as above may be followed, albeit with a few additional steps.
Enter the following command to get initialize the config file of your arduino-cli -

This will print the path to the config file of your arduino-cli. If it doesn't exist, it will be created.
Now, open this file using any text editor. It should look a bit like this -
Do not confuse this configuration file with the one created for a project. The above file is used by the Arduino CLI across all projects.
For example, if you wanted to add support for STM32 based boards, you would add the URL to the additional_urls field as shown -
Any additional URLs can be added as comma-separated values between the "[]" brackets.
Now that we have seen the complete workflow with the Arduino CLI (for most projects), let's see how to integrate it with VS Code.
Integration with VS Code and other IDEs
This section shows how to integrate the Arduino CLI with VS Code. This is an advanced topic, and it is good to have some prior experience with VS Code, but not strictly necessary
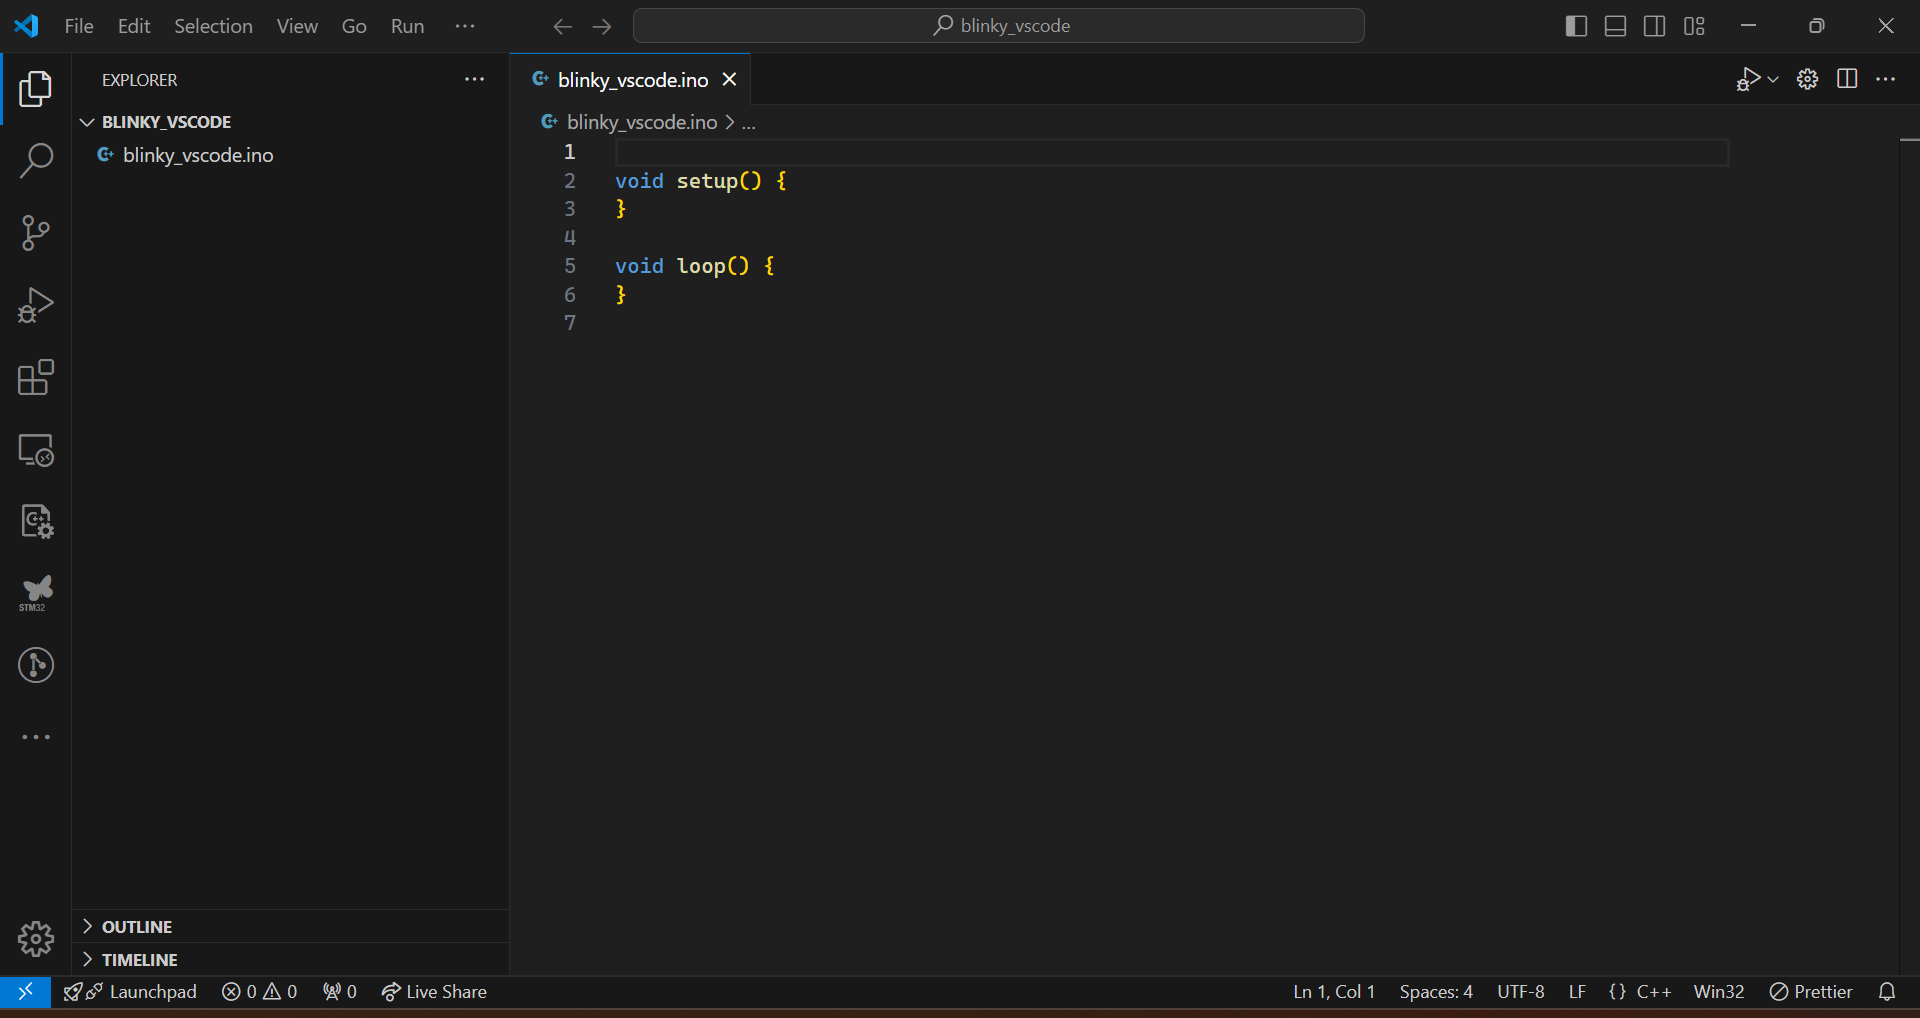
Start by creating a new project (as explained in the previous section), and opening the project directory in VS Code, as shown -

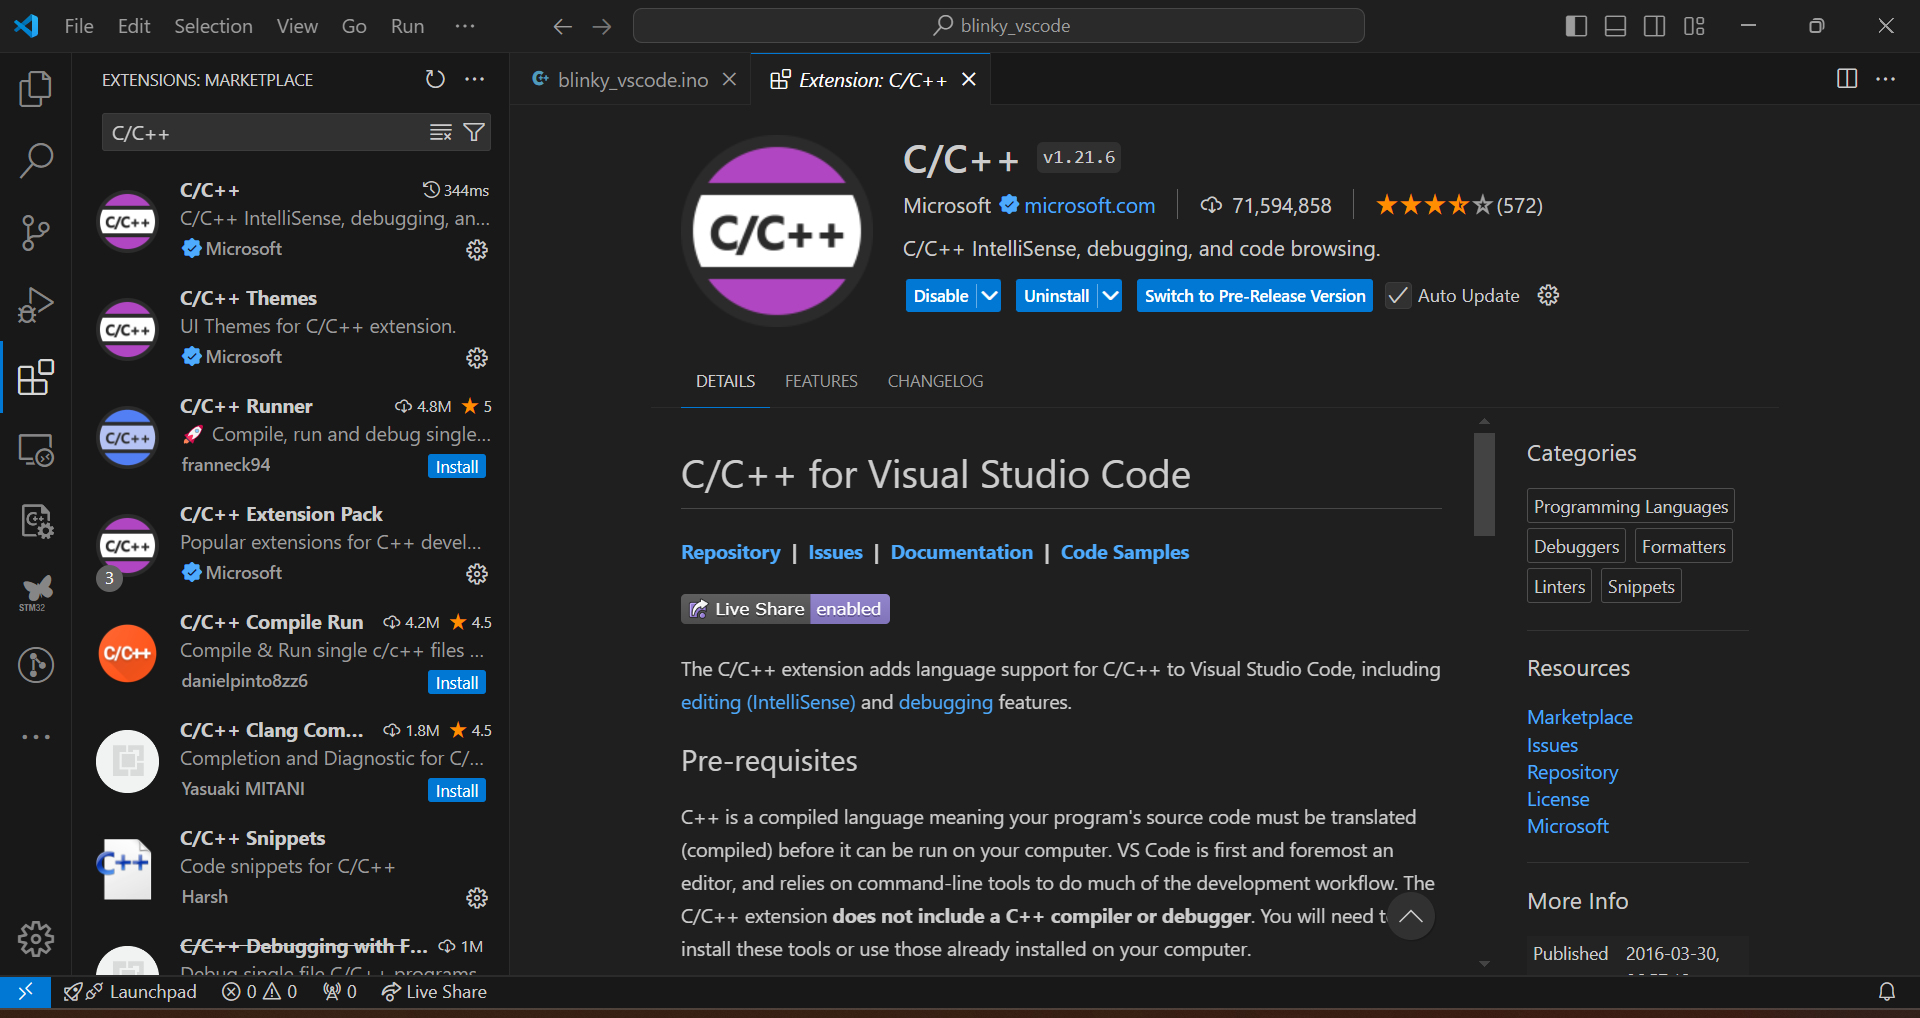
After this, get the C/C++ extension using the VS Code Extension Explorer, as shown -
Next, create a directory named .vscode in the project directory, with two files, as shown -
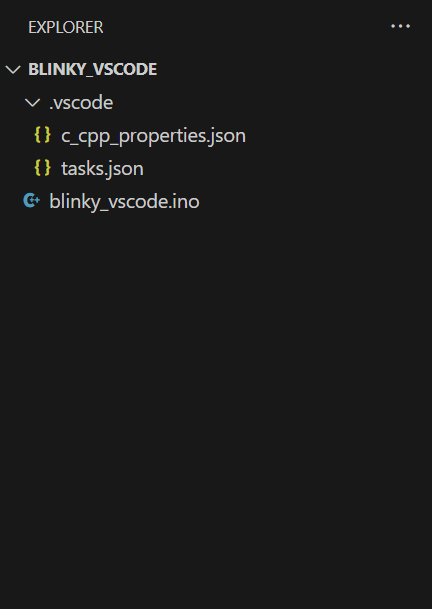
The ".vscode" directory is a special directory in VS Code which can contain configuration files, tasks and other workspace settings and customizations (ou can read more about it here). The tasks.json file contains tasks that the IDE can run, while the c_cpp_properties.json file includes configuration for the C/C++ extension to provide intellisense, autocompletion etc.
Add the following code into the tasks.json file -
The file defines two tasks - a build task which compiles the program, and an upload task that uploads this to your Arduino. Make sure to use the right board and serial port in the args fields of the tasks.
After this, add the following code into the c_cpp_properties.json file -
The above file tells the extension to use the "compile_commands.json"file (in the build directory) to get the complete list of commands used to build the program. From this,, the extension is able to infer the include directories, macros and othe rdetails that it can use to provide syntax highlighting, autocompletion etc. You can open the compile_commands file yourself and see the commands that the Arduino CLI executes to build your program.
The compile_commands.json file is a file that is commonly called acompilation database. A compilation database typically consists of the list of commands that are executed to build your program, along with their arguments, working directories, and output files. This is not unique to the Arduino CLI, and is produced by various build systems and tools for easy integration with IDEs.
After this, copy and paste the program from the blinky sketch shown earlier into the source file, with the addition of one line as shown -
The #include "Arduino.h" line is normally added by the Arduino CLI implicitly, but is necessary in this case for the IDE to provide syntax-highlighting and other features.
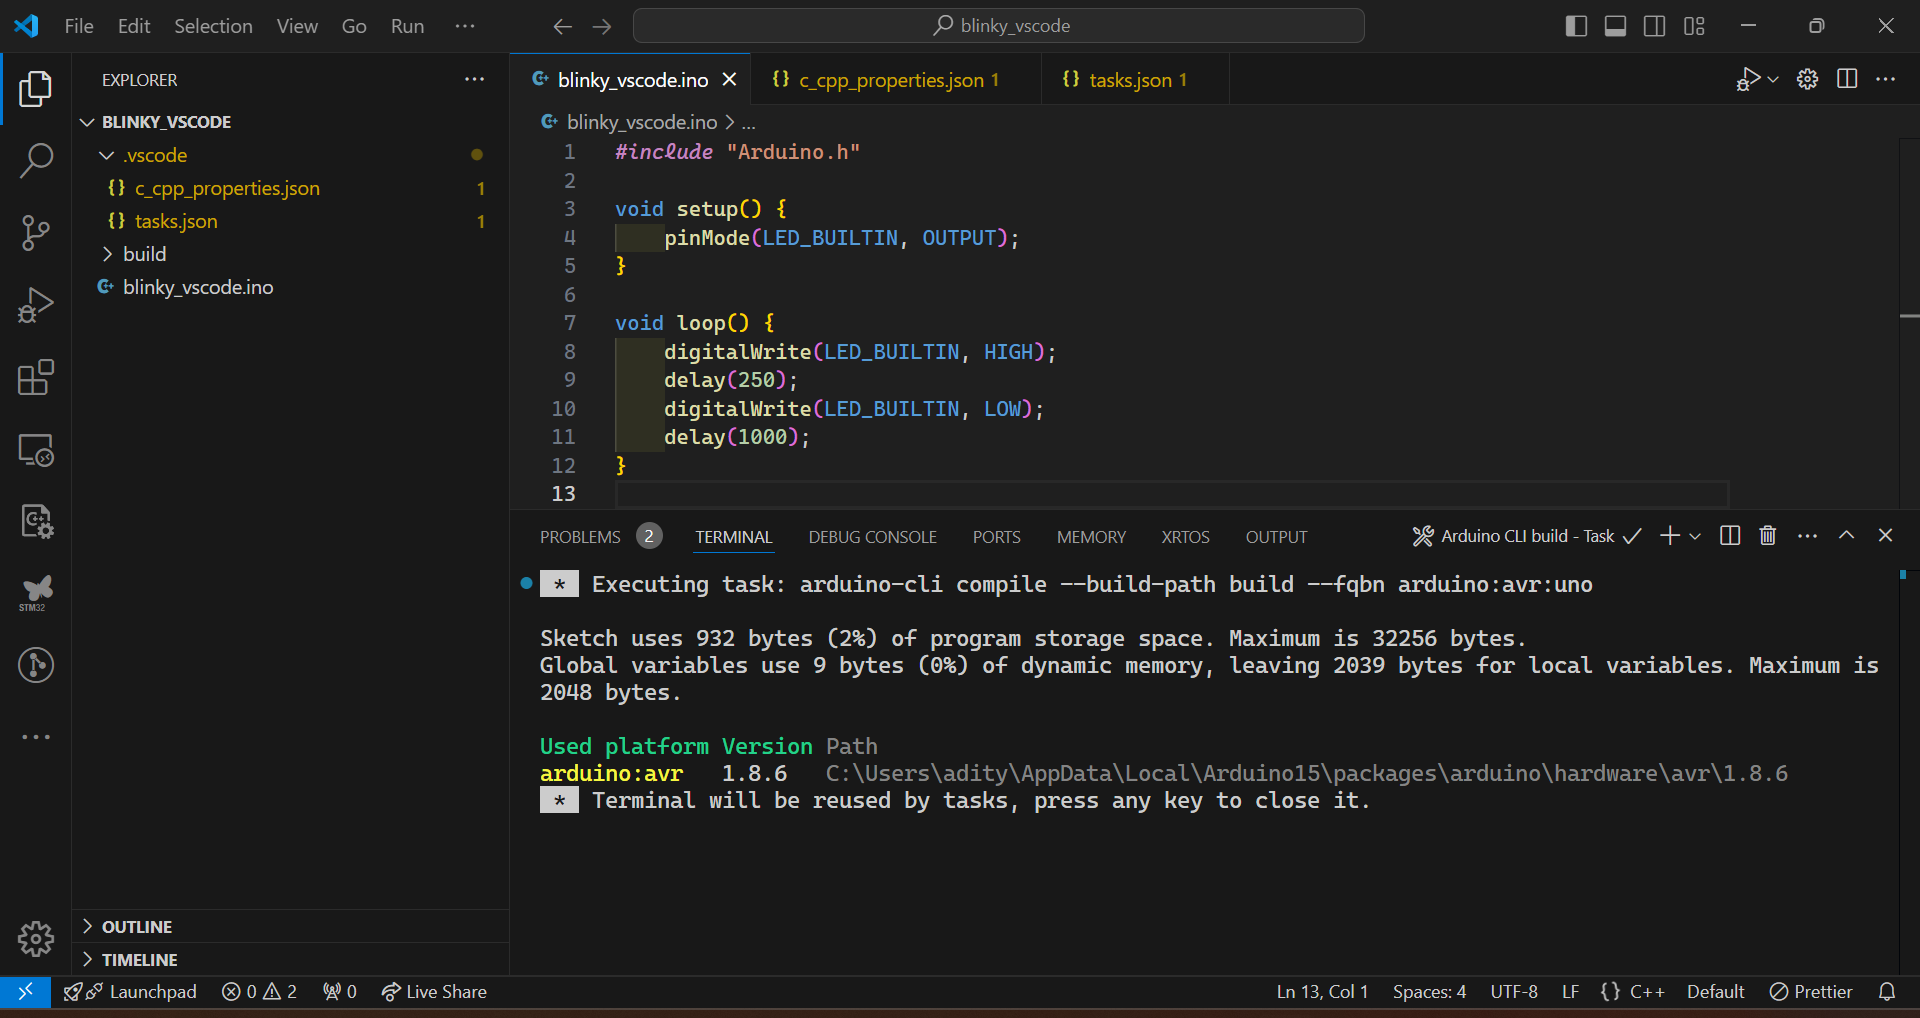
You can now build your programs using the keyboard shortcut"Ctrl+Shift+B" ("Cmd+Shift+B" on MacOS), as shown -
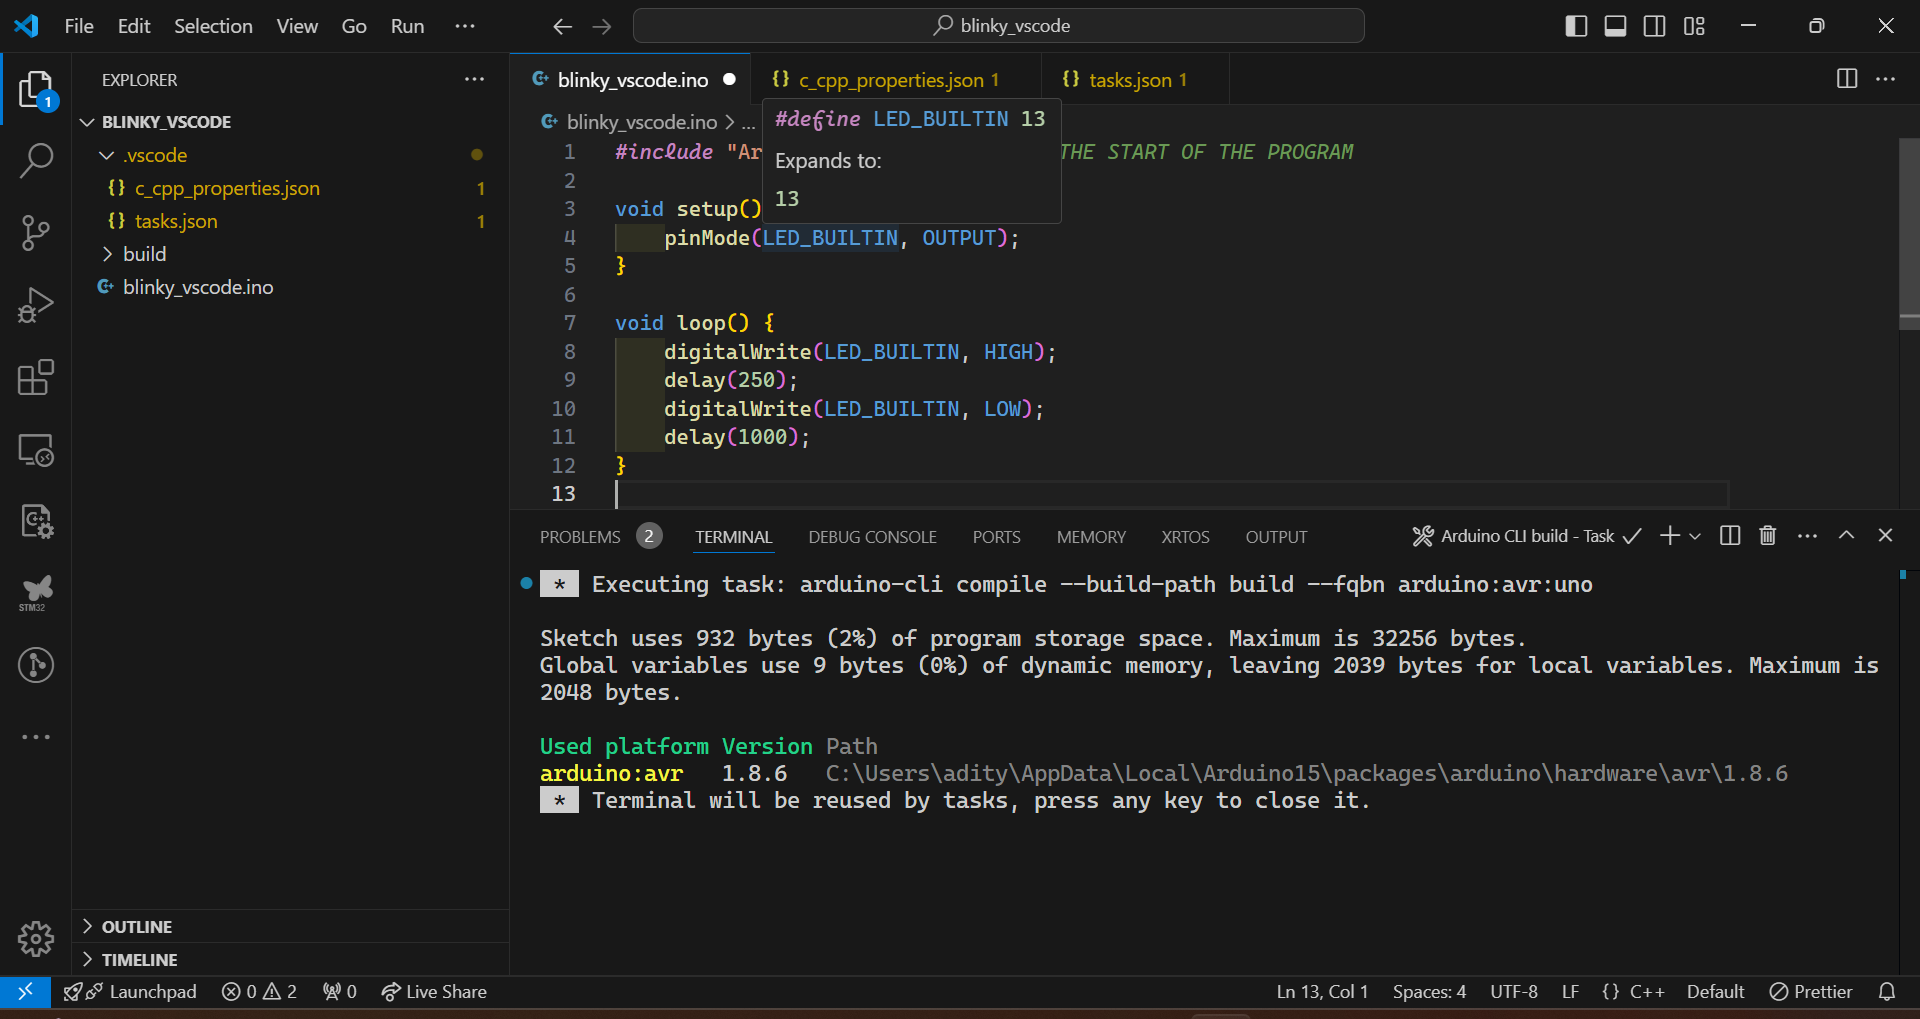
Because of the integration, we can also use advanced IDE features, such as macro expansion for the LED_BUILTIN macro, as shown -
To upload programs, use the keyboard shortcut "Ctrl+Shift+P" ("Cmd+Shift+P" on MacOS) to open the command palette, and selecting the "Run Task" option, as shown -
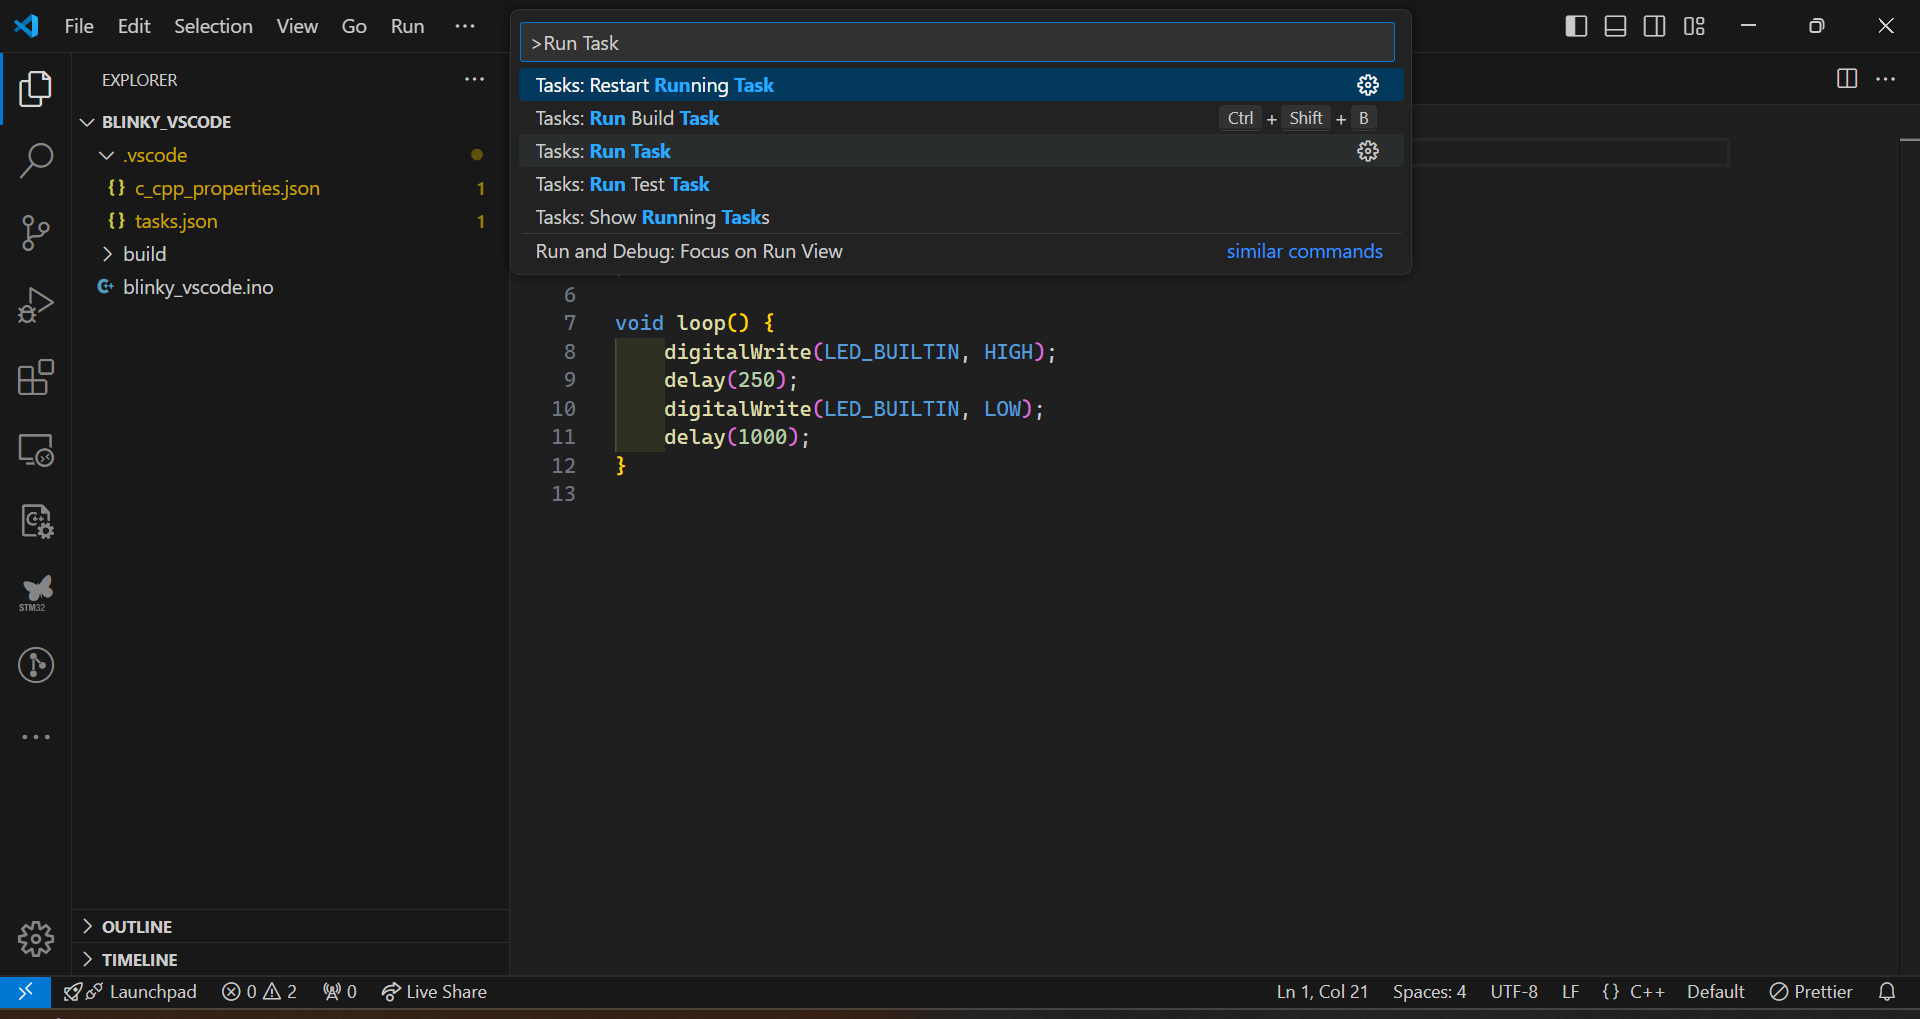
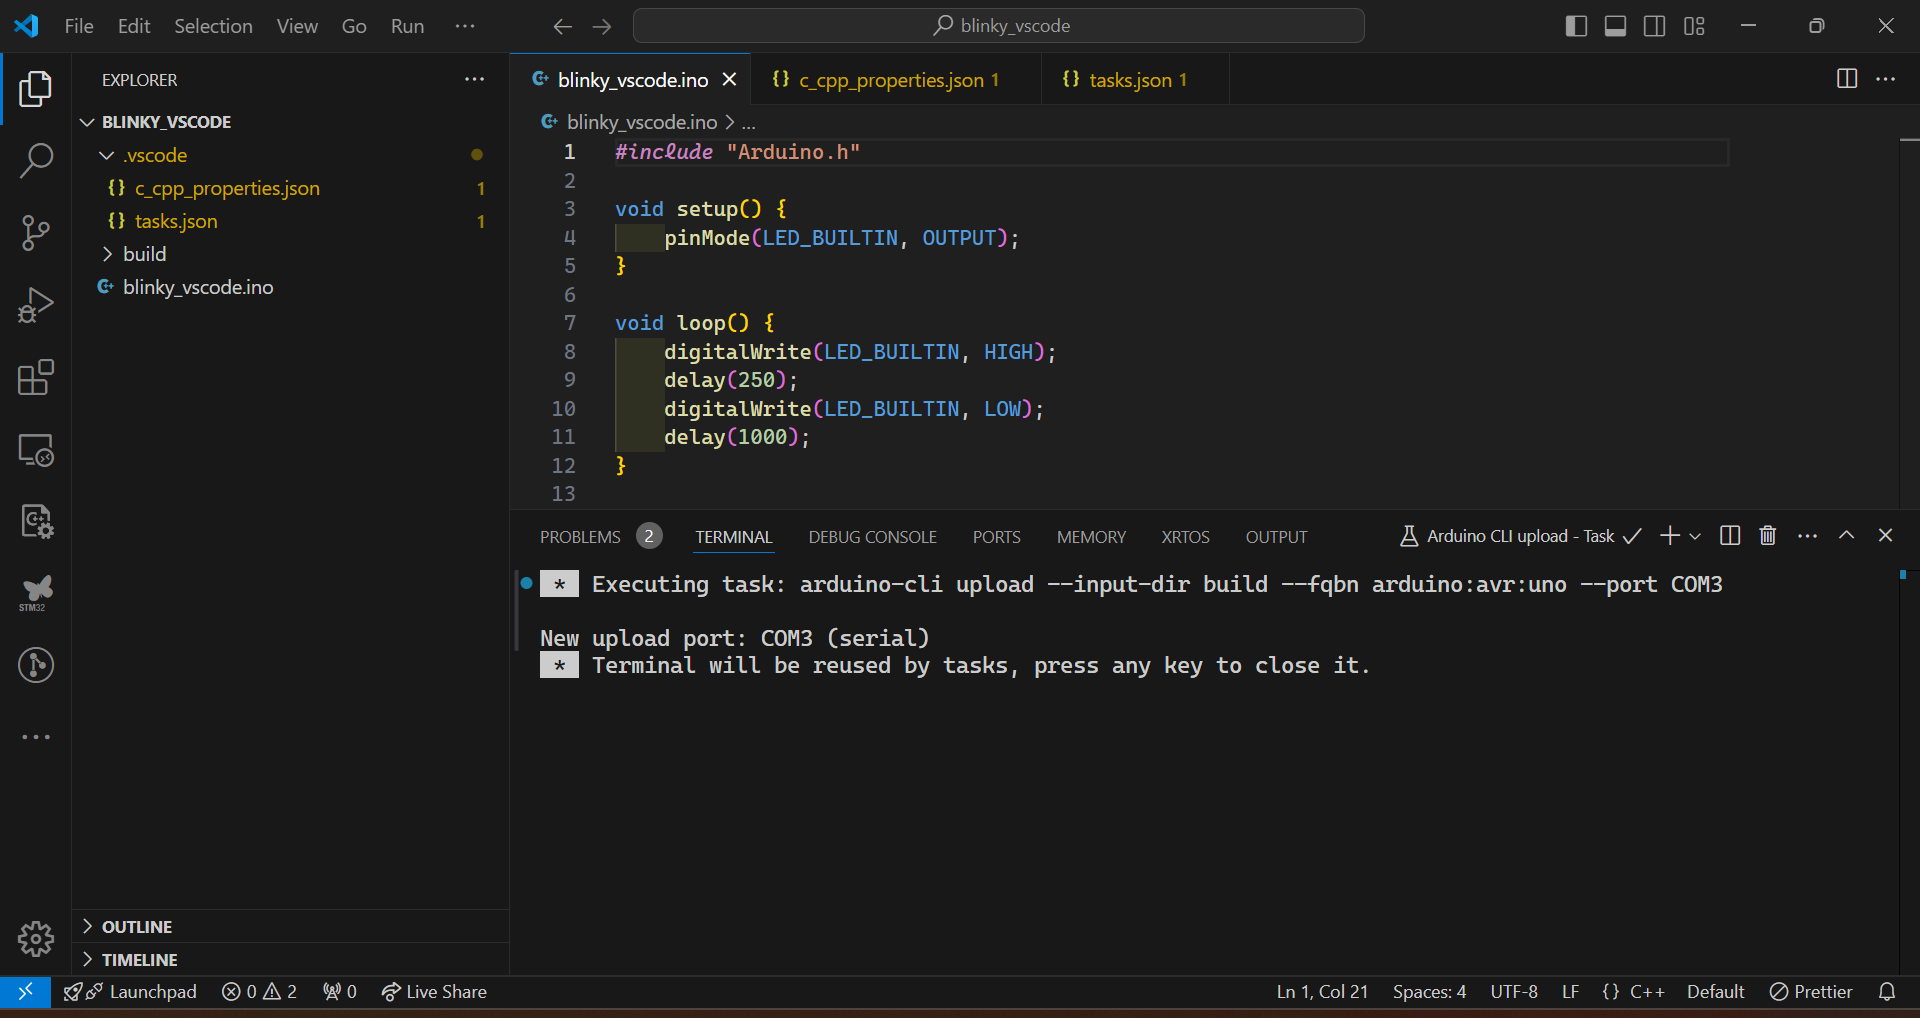
Select the task labelled Arduino CLI upload (as mentioned in the tasks.json file) after connecting your Arduino and the program should be uploaded to your board.
And that's it! This successfully completes the integration of the Arduino CLI with VS Code. The Arduino CLi will automatically update the compile_commands.json file if you add more files/libraries to the project, which will also update the intellisense offered by the IDE.
Final Thoughts
This was a long blog, and intended to comprehensively explain the Arduino CLI, the increases flexibility it offers (compared to the Arduino IDE), and how it makes your development more productive and enjoyable. After reading this blog, you should be just as familiar with the Arduino CLI as you are with the Arduino IDE, and be prepared to take your Arduino development to the next level.
If you found any steps to be missing or incorrect, or have any thoughts and ideas to share, feel free to leave them in the comments down below. Good luck!
Summary of commands
This section includes a "cheatsheet" for the Arduino CLI commands, that you can refer to when setting up your projects.